MicroStack (Sunbeam)
Openstack on Kubernetes
시작 설정 및 정의
마이크로스택(MicroStack)에 대한 설치 및 설정을 시작하기 전에, MicroStack에 대해 간략히 알아보겠다. MicroStack 오픈스택(OpenStack)의 경량 버전으로서, 작은 규모의 개발 및 테스트 환경에 적합 한다. MicroStack은 신속한 배포와 간편한 설정을 제공하며, 개발자와 엔지니어들이 오픈스택을 쉽게 경험하고 활용할 수 있도록 도와 준다.
오픈스택은 대규모 클라우드 컴퓨팅 환경을 구축하고 관리하기 위한 오픈 소스 플랫폼. 가상화 기술을 활용하여 컴퓨팅, 스토리지 및 네트워킹 리소스를 효율적으로 관리할 수 있게 해준다.
MicroStack과 함께 사용되는 Sunbeam은 원래의 오픈스택 기능을 간결하게 제공하면서 네이티브 쿠버네티스 경험을 제공한다. 사용자에게 직관적인 대시보드와 강력한 기능을 제공하여 클라우드 인프라의 관리 및 모니터링을 용이하게 한다.
Sunbeam은 오픈스택 서비스를 위한 Kubernetes 오퍼레이터를 작성하기 위한 라이브러리 모음.
마이크로쿠버네티스(MicroK8s)는 경량화된 Kubernetes 배포판으로서, 로컬 환경에서 쉽게 Kubernetes 클러스터를 구축하고 실행할 수 있도록 도와준다. 이는 하나의 노드로 구성된 단일 클러스터로, 가벼우면서도 빠르게 구성할 수 있다.
그 외 MicroStack의 스토리지 서비스는 분산형 객체 스토리지 시스템인 세프(Ceph)의 기반으로 가동 하므로, 동일하게 Ceph의 경량 버전인 마이크로세프(MicroCeph)를 사용한다.
아래 링크들을 통해 위에 계시 된 툴들을 더 자세하게 파악 할 수 있다.
설치전 요구 사항
- Ubuntu 서버 20.04 버전 또는 22.04 버전 (Baremetal or VM)
- VM을 사용 하는 경우 Nested Virtualization 활성화 여부 확인
- 적어도 4 CPU 코어, 16GB 메모리 그리고 50GB+ 디스크 공간
- MicroStack External Network용 비워둔 네트워크 인터페이스
- MicroCeph용 새로운 디스크
사용된 환경
- VMWare Workstation Pro 가상 머신(Ubuntu 22.04 LTS)
- Virtualization 설정 활성화
- 2개의 네트워크 인터페이스 - ens32 VM용 + ens34 MicroStack용
- 6개 CPU 코어
- 16GB 메모리
- 60GB 디스크 공간 for VM
- 20GB 비워둔 디스크 공간 for MicroCeph
- 네트워크: 192.168.1.80/24 및 2번째 NIC는 아무 설정 없음
설치 과정
설치 작업을 진행하기 전에, 현재 테스트 해본 MicroStack Sunbeam의 버전들은 아래와 같다:
- sunbeam/beta 버전
- 2023.1 버전
- 2023.1/stable/vancouver 버전
현재 이슈
모든 버전들은 리부팅 후 MicroStack 접속이 안된다. 이슈를 보니 일단 microk8s 쪽에서는 OpenStack 파드들이 잘 올라오는 것을 확인 할 수 있다.
Every 2.0s: juju status --color -m openstack                                                                                                                 ubuntu: Sun Jun 11 19:12:25 2023

Model      Controller          Cloud/Region        Version  SLA          Timestamp
openstack  microk8s-localhost  microk8s/localhost  3.1.2    unsupported  19:12:25Z

App                    Version                  Status   Scale  Charm                      Channel     Rev  Address         Exposed  Message
certificate-authority                           active       1  tls-certificates-operator  stable       22  10.152.183.141  no
glance                                          waiting      1  glance-k8s                 yoga/beta    27  10.152.183.244  no       installing agent
horizon                                         waiting      1  horizon-k8s                yoga/beta    32  10.152.183.184  no       installing agent
keystone                                        waiting      1  keystone-k8s               yoga/beta    82  10.152.183.186  no       installing agent
mysql                  8.0.32-0ubuntu0.22.04.2  active       1  mysql-k8s                  8.0/stable   75  10.152.183.67   no       Primary
neutron                                         waiting      1  neutron-k8s                yoga/beta    29  10.152.183.157  no       installing agent
nova                                            waiting      1  nova-k8s                   yoga/beta    20  10.152.183.254  no       installing agent
ovn-central                                     active       1  ovn-central-k8s            22.03/beta   35  10.152.183.99   no
ovn-relay                                       active       1  ovn-relay-k8s              22.03/beta   25  10.152.183.133  no
placement                                       waiting      1  placement-k8s              yoga/beta    18  10.152.183.25   no       installing agent
rabbitmq               3.11.3                   active       1  rabbitmq-k8s               3.11/beta    10  10.152.183.142  no
traefik                2.9.6                    waiting      1  traefik-k8s                1.0/stable  110  10.152.183.60   no       installing agent

Unit                      Workload  Agent      Address       Ports  Message
certificate-authority/0*  active    idle       10.1.243.217
glance/0*                 waiting   idle       10.1.243.210         (ingress-internal) integration incomplete
horizon/0*                waiting   executing  10.1.243.214         (ingress-internal) integration incomplete
keystone/0*               waiting   idle       10.1.243.198         (workload) Not all relations are ready
mysql/0*                  active    idle       10.1.243.216         Primary
neutron/0*                waiting   idle       10.1.243.203         (workload) Not all relations are ready
nova/0*                   waiting   idle       10.1.243.207         (workload) Not all relations are ready
ovn-central/0*            active    idle       10.1.243.209
ovn-relay/0*              active    idle       10.1.243.199
placement/0*              waiting   idle       10.1.243.208         (workload) Not all relations are ready
rabbitmq/0*               active    idle       10.1.243.196
traefik/0*                waiting   idle       10.1.243.205         gateway address unavailable
그렇지만 juju 상태를 실시간으로 보면 계속 waiting status만 보인다.
이 이슈는 현재 MicroStack 개발자들도 인지 하고 있는 이슈이다. 간단한 fix는 waiting 상태에 오래 있는 서비스들의 파드를 삭제 해주면, 파드가 자동으로 재생성 되면서 서비스가 active상태로 바뀐다. 하지만 그렇게 MicroStack이 작동을 하지만:
- OpenStack 라우터와 통신이 안되는 경우가 있다. 만약에 라우터와 통신이 돼면, 내부의 인스턴스와 통신이 안된다
- OpenStack-hypervisor 상태가 DOWN으로 바뀌면서 수동으로 UP상태로 바꾸거나, 서비스 재시작 또는 재설치시에도 상태가 안 바뀐다
## 재부팅 전

openstack hypervisor list
+----+---------------------+-----------------+--------------+-------+
| ID | Hypervisor Hostname | Hypervisor Type | Host IP      | State |
+----+---------------------+-----------------+--------------+-------+
|  1 | ubuntu              | QEMU            | 192.168.1.80 | up    |
+----+---------------------+-----------------+--------------+-------+

## 재부팅 후
openstack hypervisor list
+----+---------------------+-----------------+--------------+-------+
| ID | Hypervisor Hostname | Hypervisor Type | Host IP      | State |
+----+---------------------+-----------------+--------------+-------+
|  1 | ubuntu              | QEMU            | 192.168.1.80 | down  |
+----+---------------------+-----------------+--------------+-------+
OpenStack의 Hypervisor상태가 DOWN이라서 인스턴스 생성도 불가능 하다. Nova-compute 상태도 down으로 나오는 원인도 동일하다.
openstack compute service list
+----+----------------+--------+----------+---------+-------+----------------------------+
| ID | Binary         | Host   | Zone     | Status  | State | Updated At                 |
+----+----------------+--------+----------+---------+-------+----------------------------+
|  1 | nova-scheduler | nova-0 | internal | enabled | up    | 2023-06-13T04:19:06.000000 |
|  2 | nova-conductor | nova-0 | internal | enabled | up    | 2023-06-13T04:19:14.000000 |
|  8 | nova-compute   | ubuntu | nova     | enabled | down  | 2023-06-12T18:08:40.000000 |
+----+----------------+--------+----------+---------+-------+----------------------------+
그리고 2023.1 버전만의 이슈는 Cinder 볼륨 상태 이다. 모든 요소들 설치는 문제 없이 진행 되지만 cinder-ceph 만 설치가 안된다

위에 있는 Workload가 Blocked 상태이라서 실제 MicroStack 설치 후 볼륨 서비스의 볼륨 생성 이 되지 않는다

그 외 MicroCeph 설정 완료 후에 시도 후에는는 아래와 같이 glance 워크로드가 integration incomplete이라고 뜬다

마지막으로 최신 버전인 stable/vancouver에서는 문제 없이 설정 완료 및 볼륨까지 생성은 되지만, 현재 Cinder에 의해 생성된 Ceph의 볼륨은 컴퓨트 인스턴스에 연결할 수 없다. 연결이 실패하거나 파드들이 Crash된다. 더 자세한 Bug내용은 여기서 확인.
MicroStack 관련 검사 및 로그 수집을 위해 명령어들의 모집은 여기에서 확인 할 수 있다. MicroStack의 작동 중 이슈 발생 시 적합 하다.
sunbeam/beta 버전 설치 및 설정
설치 과정은 수동과 자동 방식이 있다. 자동 방식은 아래와 같이 추가 설정 없이 명령어 2개로 모든 설치 과정이 끝난다.
sudo snap install microstack  --channel sunbeam/edge
microstack install-script | bash -x
설치 스크립트를 통해 기본 설정으로 Microk8s과 MicroStack 설치가 완료 된다. 하지만 수동으로 설정 할 시 필요한 패키지 버전들과 custom 설정들을 할 수 있다.
수동으로 설치를 진행 해보았다. 일단 제일 먼저 해야 되는 것은 네트워크 인터페이스 상태 확인 이다.
ip addr
1: lo: <LOOPBACK,UP,LOWER_UP> mtu 65536 qdisc noqueue state UNKNOWN group default qlen 1000
    link/loopback 00:00:00:00:00:00 brd 00:00:00:00:00:00
    inet 127.0.0.1/8 scope host lo
       valid_lft forever preferred_lft forever
    inet6 ::1/128 scope host
       valid_lft forever preferred_lft forever
2: ens32: <BROADCAST,MULTICAST,UP,LOWER_UP> mtu 1500 qdisc fq_codel state UP group default qlen 1000
    link/ether 00:0c:29:ab:7d:5f brd ff:ff:ff:ff:ff:ff
    altname enp2s0
    inet 192.168.1.80/24 brd 192.168.1.255 scope global ens32
       valid_lft forever preferred_lft forever
    inet6 fe80::20c:29ff:feab:7d5f/64 scope link
       valid_lft forever preferred_lft forever
3: ens34: <BROADCAST,MULTICAST> mtu 1500 qdisc noop state DOWN group default qlen 1000
    link/ether 00:0c:29:ab:7d:69 brd ff:ff:ff:ff:ff:ff
    altname enp2s2
보이는것 과 같이 ens32는 현재 가상 머신의 네트워크 인터페이스이고, ens34는 네트워크 부여 없는 추가 인터페이스이다. 추가 적인 인터페이스는 나중에 OpenStack용으로 사용 될 것이다.
먼저 microk8s를 설치 한다
sudo snap install microk8s --channel 1.25-strict/stable
microk8s (1.25-strict/stable) v1.25.10 from Canonical✓ installed
그 후 microk8s 상태를 확인 한다
sudo microk8s status --wait-ready

microk8s is running
high-availability: no
  datastore master nodes: 127.0.0.1:19001
  datastore standby nodes: none
addons:
  enabled:
    ha-cluster           # (core) Configure high availability on the current node
    helm                 # (core) Helm - the package manager for Kubernetes
    helm3                # (core) Helm 3 - the package manager for Kubernetes
  disabled:
    cert-manager         # (core) Cloud native certificate management
    community            # (core) The community addons repository
    dashboard            # (core) The Kubernetes dashboard
    dns                  # (core) CoreDNS
    host-access          # (core) Allow Pods connecting to Host services smoothly
    hostpath-storage     # (core) Storage class; allocates storage from host directory
    ingress              # (core) Ingress controller for external access
    mayastor             # (core) OpenEBS MayaStor
    metallb              # (core) Loadbalancer for your Kubernetes cluster
    metrics-server       # (core) K8s Metrics Server for API access to service metrics
    observability        # (core) A lightweight observability stack for logs, traces and metrics
    prometheus           # (core) Prometheus operator for monitoring and logging
    rbac                 # (core) Role-Based Access Control for authorisation
    registry             # (core) Private image registry exposed on localhost:32000
    storage              # (core) Alias to hostpath-storage add-on, deprecated
상태 확인 후 dns 서비스 부터 활성화 한다.
sudo microk8s enable dns:8.8.8.8,8.8.4.4

Infer repository core for addon dns
Enabling DNS
Applying manifest
serviceaccount/coredns created
configmap/coredns created
deployment.apps/coredns created
service/kube-dns created
clusterrole.rbac.authorization.k8s.io/coredns created
clusterrolebinding.rbac.authorization.k8s.io/coredns created
Restarting kubelet
DNS is enabled
기본적으로 host의 백엔드 스토리지를 사용하기 위해 storage 서비스 활성화 한다
sudo microk8s enable hostpath-storage

Infer repository core for addon hostpath-storage
Enabling default storage class.
WARNING: Hostpath storage is not suitable for production environments.

deployment.apps/hostpath-provisioner created
storageclass.storage.k8s.io/microk8s-hostpath created
serviceaccount/microk8s-hostpath created
clusterrole.rbac.authorization.k8s.io/microk8s-hostpath created
clusterrolebinding.rbac.authorization.k8s.io/microk8s-hostpath created
Storage will be available soon.
다음으로 로드 밸런서 서비스인 Metallb를 활성화 한다. IP 주소 풀은 가상 머신과 동일한 네트워크 이야 된다.
Metallb는 BareMetal 쿠버네티스 환경에서 로드 밸런서를 구성하기 위한 오픈 소스 프로젝트
공식 DOC 사이트는 여기
# 현재 네트워크속 비워있는 10개 정도의 IP를 부여
sudo microk8s enable metallb 192.168.1.200-192.168.1.210

Infer repository core for addon metallb
Enabling MetalLB
Applying Metallb manifest
customresourcedefinition.apiextensions.k8s.io/addresspools.metallb.io created
customresourcedefinition.apiextensions.k8s.io/bfdprofiles.metallb.io created
customresourcedefinition.apiextensions.k8s.io/bgpadvertisements.metallb.io created
customresourcedefinition.apiextensions.k8s.io/bgppeers.metallb.io created
customresourcedefinition.apiextensions.k8s.io/communities.metallb.io created
customresourcedefinition.apiextensions.k8s.io/ipaddresspools.metallb.io created
customresourcedefinition.apiextensions.k8s.io/l2advertisements.metallb.io created
namespace/metallb-system created
serviceaccount/controller created
serviceaccount/speaker created
clusterrole.rbac.authorization.k8s.io/metallb-system:controller created
clusterrole.rbac.authorization.k8s.io/metallb-system:speaker created
role.rbac.authorization.k8s.io/controller created
role.rbac.authorization.k8s.io/pod-lister created
clusterrolebinding.rbac.authorization.k8s.io/metallb-system:controller created
clusterrolebinding.rbac.authorization.k8s.io/metallb-system:speaker created
rolebinding.rbac.authorization.k8s.io/controller created
secret/webhook-server-cert created
service/webhook-service created
rolebinding.rbac.authorization.k8s.io/pod-lister created
daemonset.apps/speaker created
deployment.apps/controller created
validatingwebhookconfiguration.admissionregistration.k8s.io/validating-webhook-configuration created
Waiting for Metallb controller to be ready.
error: timed out waiting for the condition on deployments/controller
MetalLB controller is still not ready
deployment.apps/controller condition met
ipaddresspool.metallb.io/default-addresspool created
l2advertisement.metallb.io/default-advertise-all-pools created
MetalLB is enabled
OpenStack API에 로컬 호스트 이외의 호스트에서 액세스하려는 경우, 이 IP 주소 범위는 기본 네트워크 인터페이스의 서브넷 내에 있어야 한다. 해당 범위에는 최소한 10개의 주소가 포함되어야 한다.
로드 밸런서 설정 완료 후 현재 사용중인 user에거 microk8s를 사용할 수 있게 권한을 부여 및 그룹에 추가 한다.
sudo usermod -a -G snap_microk8s $USER
sudo chown -f -R $USER ~/.kube
newgrp snap_microk8s
추가로 아래의 명령어는 /var/snap/microk8s/current/var/lock/ 디렉터리 안에 no-cert-reissue 라는 이름의 파일을 생성한다. 이 파일이 존재하는 경우, microk8s를 다시 시작하지 말아야 한다는 플래그로 작용할 수 있다.
touch /var/snap/microk8s/current/var/lock/no-cert-reissue 이후 Juju를 설치 한다. 설치 완료 후.local/share 디렉터리를 생성함으로써 Juju가 데이터를 저장하고 구성 파일을 유지하는 지정된 위치를 확보한다.
Juju는 'Charmed Operator' 프레임 워크으로서 MicroStack을 위한 배포, 관리 및 운영할 수 있는 오픈 소스 플랫폼.
더 자세한 정보는 여기
sudo snap install juju --channel 3.1/stable
juju (3.1/stable) 3.1.2 from Canonical✓ installed

# juju의 설정들이 여기에 저장 된다
mkdir -p .local/share
마지막으로 필요한 패키지들을 설치 한다
# microstack 패키지 설치
sudo snap install microstack --channel sunbeam/beta
microstack (sunbeam/edge) yoga from Canonical✓ installed

# 가상화 layer를 담담하기 위해
sudo snap install --channel yoga/beta openstack-hypervisor
openstack-hypervisor (yoga/beta) yoga from Canonical✓ installed

# Openstack CLI 명렁어를 사용하기 위해
sudo snap install openstackclients --channel xena/stable
openstackclients (xena/stable) xena from Canonical✓ installed
이제 필요한 요소들은 다 설치 되었으나 microstack을 자동으로 쿠버네티스에 올리기 위해 Juju를 사용 하여 bootstrapping 작업을 해야 한다. Juju Bootstrapping은 Juju를 클라우드나 인프라 환경에서 초기 설정하는 과정을 말한다.
# Juju Bootstrapping 시작 명령어
microstack bootstrap

Checking for presence of Juju ... done
Checking for presence of microk8s ... done
Checking for presence of openstack-hypervisor ... done
Checking health of openstack-hypervisor ... done
Bootstrapping Juju into microk8s ... done
Initializing Terraform from provider mirror ... done
This version was tested using 3.1.0 juju version 3.1.2 may have compatibility issues
unknown facade SecretBackendsManager
unexpected facade SecretBackendsManager found, unable to decipher version to use
unknown facade SecretBackendsRotateWatcher
unexpected facade SecretBackendsRotateWatcher found, unable to decipher version to use
This version was tested using 3.1.0 juju version 3.1.2 may have compatibility issues
This version was tested using 3.1.0 juju version 3.1.2 may have compatibility issues
Deploying OpenStack Control Plane to Kubernetes ... done
unknown facade SecretBackendsManager
unexpected facade SecretBackendsManager found, unable to decipher version to use
unknown facade SecretBackendsRotateWatcher
unexpected facade SecretBackendsRotateWatcher found, unable to decipher version to use
This version was tested using 3.1.0 juju version 3.1.2 may have compatibility issues
This version was tested using 3.1.0 juju version 3.1.2 may have compatibility issues
Updating hypervisor identity configuration ... done
unknown facade SecretBackendsManager
unexpected facade SecretBackendsManager found, unable to decipher version to use
unknown facade SecretBackendsRotateWatcher
unexpected facade SecretBackendsRotateWatcher found, unable to decipher version to use
This version was tested using 3.1.0 juju version 3.1.2 may have compatibility issues
This version was tested using 3.1.0 juju version 3.1.2 may have compatibility issues
Updating hypervisor RabbitMQ configuration ... done
unknown facade SecretBackendsManager
unexpected facade SecretBackendsManager found, unable to decipher version to use
unknown facade SecretBackendsRotateWatcher
unexpected facade SecretBackendsRotateWatcher found, unable to decipher version to use
This version was tested using 3.1.0 juju version 3.1.2 may have compatibility issues
This version was tested using 3.1.0 juju version 3.1.2 may have compatibility issues
Updating hypervisor OVN configuration ... done
Node has been bootstrapped as a CONVERGED node
이 작업을 실시간으로 보기 위해 현재 서버의 똑같은 유저로 2개의 새로운 콘솔을 접속 하여 아래와 같은 명령어를 사용 한다
# Juju 작업을 실시간 확인
watch --color -- juju status --color -m openstack

# 클러스터의 변경 사항 실시간 확인
watch microk8s.kubectl get all -A
Bootstrap 작업은 20 ~ 40분 사이 시간이 소요 된다
Bootstrap 작엄이 문제 없이 완료 되면 현재 OpenStack의 상태를 확인 할 수 있다
juju status --color -m openstack

Model      Controller          Cloud/Region        Version  SLA          Timestamp
openstack  microk8s-localhost  microk8s/localhost  3.1.2    unsupported  18:08:14Z

App                    Version                  Status  Scale  Charm                      Channel     Rev  Address         Exposed  Message
certificate-authority                           active      1  tls-certificates-operator  stable       22  10.152.183.141  no
glance                                          active      1  glance-k8s                 yoga/beta    27  10.152.183.244  no
horizon                                         active      1  horizon-k8s                yoga/beta    32  10.152.183.184  no       http://192.168.1.202:80/openstack-horizon
keystone                                        active      1  keystone-k8s               yoga/beta    82  10.152.183.186  no
mysql                  8.0.32-0ubuntu0.22.04.2  active      1  mysql-k8s                  8.0/stable   75  10.152.183.67   no       Primary
neutron                                         active      1  neutron-k8s                yoga/beta    29  10.152.183.157  no
nova                                            active      1  nova-k8s                   yoga/beta    20  10.152.183.254  no
ovn-central                                     active      1  ovn-central-k8s            22.03/beta   35  10.152.183.99   no
ovn-relay                                       active      1  ovn-relay-k8s              22.03/beta   25  192.168.1.200   no
placement                                       active      1  placement-k8s              yoga/beta    18  10.152.183.25   no
rabbitmq               3.11.3                   active      1  rabbitmq-k8s               3.11/beta    10  192.168.1.201   no
traefik                2.9.6                    active      1  traefik-k8s                1.0/stable  110  192.168.1.202   no

Unit                      Workload  Agent  Address       Ports  Message
certificate-authority/0*  active    idle   10.1.243.204
glance/0*                 active    idle   10.1.243.207
horizon/0*                active    idle   10.1.243.213
keystone/0*               active    idle   10.1.243.218
mysql/0*                  active    idle   10.1.243.202         Primary
neutron/0*                active    idle   10.1.243.208
nova/0*                   active    idle   10.1.243.219
ovn-central/0*            active    idle   10.1.243.215
ovn-relay/0*              active    idle   10.1.243.210
placement/0*              active    idle   10.1.243.209
rabbitmq/0*               active    idle   10.1.243.212
traefik/0*                active    idle   10.1.243.205
동일하게 현재 클러스터 상태도 확인 할 수 있다
sudo microk8s.kubectl get all -A
NAMESPACE NAME READY STATUS RESTARTS AGE
kube-system pod/calico-node-h2h2q 1/1 Running 0 39m
kube-system pod/coredns-d489fb88-j2mk2 1/1 Running 0 38m
kube-system pod/calico-kube-controllers-d8b9b6478-qkjnn 1/1 Running 0 39m
kube-system pod/hostpath-provisioner-766849dd9d-srkpk 1/1 Running 0 36m
metallb-system pod/controller-56c4696b5-spbpx 1/1 Running 0 36m
metallb-system pod/speaker-zsxfn 1/1 Running 0 36m
controller-microk8s-localhost pod/controller-0 3/3 Running 1 (21m ago) 22m
controller-microk8s-localhost pod/modeloperator-8449b84544-brbsv 1/1 Running 0 21m
openstack pod/modeloperator-c59b89747-mgll6 1/1 Running 0 21m
openstack pod/certificate-authority-0 1/1 Running 0 20m
openstack pod/mysql-0 2/2 Running 0 20m
openstack pod/glance-0 2/2 Running 0 20m
openstack pod/neutron-0 2/2 Running 0 20m
openstack pod/ovn-relay-0 2/2 Running 0 20m
openstack pod/rabbitmq-0 2/2 Running 0 19m
openstack pod/horizon-0 2/2 Running 0 19m
openstack pod/keystone-0 2/2 Running 0 19m
openstack pod/traefik-0 2/2 Running 0 20m
openstack pod/ovn-central-0 4/4 Running 0 19m
openstack pod/placement-0 2/2 Running 0 20m
openstack pod/nova-0 4/4 Running 0 18m
NAMESPACE NAME TYPE CLUSTER-IP EXTERNAL-IP PORT(S) AGE
default service/kubernetes ClusterIP 10.152.183.1 <none> 443/TCP 39m
kube-system service/kube-dns ClusterIP 10.152.183.10 <none> 53/UDP,53/TCP,9153/TCP 38m
metallb-system service/webhook-service ClusterIP 10.152.183.27 <none> 443/TCP 36m
controller-microk8s-localhost service/controller-service ClusterIP 10.152.183.147 <none> 17070/TCP 22m
controller-microk8s-localhost service/modeloperator ClusterIP 10.152.183.146 <none> 17071/TCP 21m
openstack service/modeloperator ClusterIP 10.152.183.156 <none> 17071/TCP 21m
openstack service/mysql ClusterIP 10.152.183.67 <none> 65535/TCP 20m
openstack service/mysql-endpoints ClusterIP None <none> <none> 20m
openstack service/certificate-authority ClusterIP 10.152.183.141 <none> 65535/TCP 20m
openstack service/traefik-endpoints ClusterIP None <none> <none> 20m
openstack service/certificate-authority-endpoints ClusterIP None <none> <none> 20m
openstack service/glance-endpoints ClusterIP None <none> <none> 20m
openstack service/neutron-endpoints ClusterIP None <none> <none> 20m
openstack service/placement-endpoints ClusterIP None <none> <none> 20m
openstack service/ovn-relay-endpoints ClusterIP None <none> <none> 20m
openstack service/rabbitmq-endpoints ClusterIP None <none> <none> 20m
openstack service/ovn-central-endpoints ClusterIP None <none> <none> 20m
openstack service/horizon-endpoints ClusterIP None <none> <none> 20m
openstack service/neutron ClusterIP 10.152.183.157 <none> 9696/TCP 20m
openstack service/placement ClusterIP 10.152.183.25 <none> 8778/TCP 20m
openstack service/ovn-relay LoadBalancer 10.152.183.133 192.168.1.200 6642:31222/TCP 20m
openstack service/keystone-endpoints ClusterIP None <none> <none> 19m
openstack service/glance ClusterIP 10.152.183.244 <none> 9292/TCP 20m
openstack service/rabbitmq LoadBalancer 10.152.183.142 192.168.1.201 5672:31244/TCP,15672:31620/TCP 20m
openstack service/nova-endpoints ClusterIP None <none> <none> 19m
openstack service/horizon ClusterIP 10.152.183.184 <none> 80/TCP 20m
openstack service/ovn-central ClusterIP 10.152.183.99 <none> 6641/TCP,6642/TCP 20m
openstack service/keystone ClusterIP 10.152.183.186 <none> 5000/TCP 19m
openstack service/nova ClusterIP 10.152.183.254 <none> 8774/TCP 19m
openstack service/traefik LoadBalancer 10.152.183.60 192.168.1.202 80:31408/TCP,443:31255/TCP 20m
openstack service/mysql-primary ClusterIP 10.152.183.197 <none> 3306/TCP 16m
openstack service/mysql-replicas ClusterIP 10.152.183.90 <none> 3306/TCP 16m
NAMESPACE NAME DESIRED CURRENT READY UP-TO-DATE AVAILABLE NODE SELECTOR AGE
kube-system daemonset.apps/calico-node 1 1 1 1 1 kubernetes.io/os=linux 39m
metallb-system daemonset.apps/speaker 1 1 1 1 1 kubernetes.io/os=linux 36m
NAMESPACE NAME READY UP-TO-DATE AVAILABLE AGE
kube-system deployment.apps/calico-kube-controllers 1/1 1 1 39m
kube-system deployment.apps/coredns 1/1 1 1 38m
kube-system deployment.apps/hostpath-provisioner 1/1 1 1 37m
metallb-system deployment.apps/controller 1/1 1 1 36m
controller-microk8s-localhost deployment.apps/modeloperator 1/1 1 1 21m
openstack deployment.apps/modeloperator 1/1 1 1 21m
NAMESPACE NAME DESIRED CURRENT READY AGE
kube-system replicaset.apps/calico-kube-controllers-d8b9b6478 1 1 1 39m
kube-system replicaset.apps/coredns-d489fb88 1 1 1 38m
kube-system replicaset.apps/hostpath-provisioner-766849dd9d 1 1 1 36m
metallb-system replicaset.apps/controller-56c4696b5 1 1 1 36m
controller-microk8s-localhost replicaset.apps/modeloperator-8449b84544 1 1 1 21m
openstack replicaset.apps/modeloperator-c59b89747 1 1 1 21m
NAMESPACE NAME READY AGE
controller-microk8s-localhost statefulset.apps/controller 1/1 22m
openstack statefulset.apps/certificate-authority 1/1 20m
openstack statefulset.apps/mysql 1/1 20m
openstack statefulset.apps/glance 1/1 20m
openstack statefulset.apps/neutron 1/1 20m
openstack statefulset.apps/ovn-relay 1/1 20m
openstack statefulset.apps/rabbitmq 1/1 19m
openstack statefulset.apps/horizon 1/1 19m
openstack statefulset.apps/keystone 1/1 19m
openstack statefulset.apps/traefik 1/1 20m
openstack statefulset.apps/ovn-central 1/1 19m
openstack statefulset.apps/placement 1/1 20m
openstack statefulset.apps/nova 1/1 18m생성 확인 완료 후 OpenStack 클라우드의 초기 설정을 진행 해야 한다. 현재 MicroStack을 사용 하기 때문에 아래와 같이 초기 설정을 진행 한다
microstack configure -o demo_openrc

Initializing Terraform from provider mirror ... done
Username to use for access to OpenStack (demo):
Password to use for access to OpenStack (ultAzOz8ti8Z):
Network range to use for project network (192.168.122.0/24): 											# OpenStack 내부 네트워크 지정
Setup security group rules for SSH and ICMP ingress [y/n] (y):
Local or remote access to VMs [local/remote] (local): remote											# remote을 해야만 Host PC와 SSH 접속이 유지되고 OpenStack Dashboard 세션 연결 가능하다
CIDR of OpenStack external network - arbitrary but must not be in use (10.20.20.0/24): 192.168.1.0/24   # OpenStack 외부 네트워크 지정
Start of IP allocation range for external network (192.168.1.2): 192.168.1.3
End of IP allocation range for external network (192.168.1.254): 192.168.1.70
Network type for access to external network [flat/vlan] (flat):
Configuring OpenStack cloud for use ... done
Writing openrc to demo_openrc ... done
Generating openrc for cloud usage ... done
? Updating hypervisor external network configuration ...
초기 설정 완료 후 아래 명령어를 통해 admin 계정을 생성 할 수 있다.
microstack openrc > admin_openrc웹 UI를 접속 하기 위해 OpenStack Dashboard(horizon)이 어떤 IP를 부여 받았는지 확인 해야 한다.
juju status -m openstack 2>/dev/null | grep horizon | head -n 1 | awk '{print $9}'
http://192.168.1.202:80/openstack-horizon
바로 접속을 해보면:
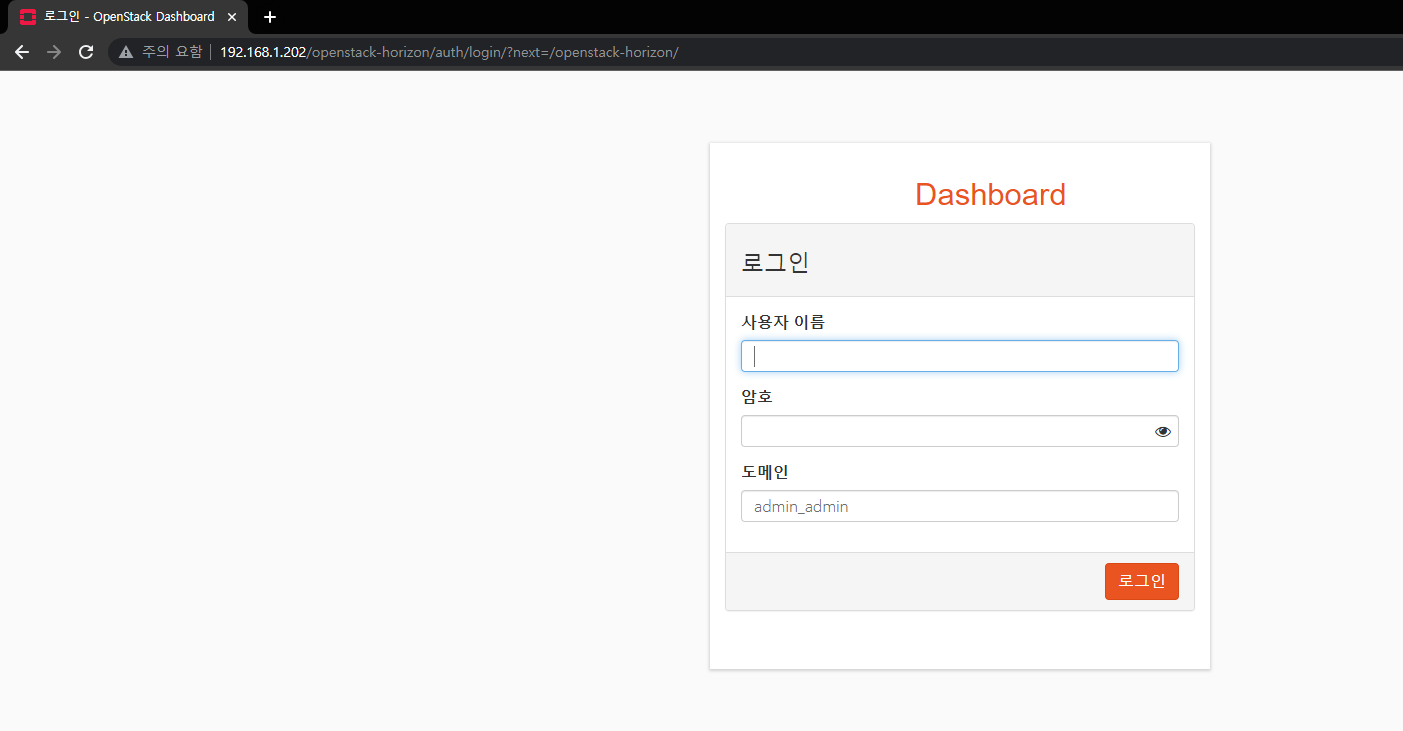
demo 유저로 로그인을 하기 위해 demo 유저의 Credentials을 확인 해야 한다. 현재 디렉토리의 저장된 demo_openrc 파일을 열어본다.
ls
admin_openrc  config  demo_openrc  snap

cat demo_openrc
export OS_AUTH_URL=http://192.168.1.202:80/openstack-keystone
export OS_USERNAME=demo
export OS_PASSWORD=MqlcF4f4t3sp
export OS_USER_DOMAIN_NAME=users
export OS_PROJECT_DOMAIN_NAME=users
export OS_PROJECT_NAME=user
export OS_AUTH_VERSION=3
export OS_IDENTITY_API_VERSION=3
위에 나와있는 정보로 Dashboard을 demo 유저로 로그인 해본다.
테스트용 가상 머신을 생성 해 보았다.

이 테스트 머신과 통신을 하려면 초반에 확인 했던 OpenStack용 ens34 네트워크 인터페이스를 활성화 시켜준다. 추가로 네트워크 인터페이스가 Router의 External 인터페이스에 연결 되어 있는지 확인 한다
# ens34 인터페이스 UP 상태로 전환
sudo ip link set up dev ens34

# br-ex에 ens34 인터페이스가 추가 되어 있는 것을 확인
sudo openstack-hypervisor.ovs-vsctl show
35c97266-ccfd-40a7-afb2-7672e7aa6158
    Bridge br-ex
        datapath_type: system
        Port ens34
            Interface ens34
        Port patch-provnet-20661610-1756-402f-8df8-4e027e639e2e-to-br-int
            Interface patch-provnet-20661610-1756-402f-8df8-4e027e639e2e-to-br-int
                type: patch
                options: {peer=patch-br-int-to-provnet-20661610-1756-402f-8df8-4e027e639e2e}
        Port br-ex
            Interface br-ex
                type: internal
    Bridge br-int
        fail_mode: secure
        datapath_type: system
        Port patch-br-int-to-provnet-20661610-1756-402f-8df8-4e027e639e2e
            Interface patch-br-int-to-provnet-20661610-1756-402f-8df8-4e027e639e2e
                type: patch
                options: {peer=patch-provnet-20661610-1756-402f-8df8-4e027e639e2e-to-br-int}
        Port br-int
            Interface br-int
                type: internal
    ovs_version: "3.1.0"


## 만약에 자동으로 추가가 안되어 있는 경우
sudo openstack-hypervisor.ovs-vsctl add-port br-ex ens34
이 버전의 문제점은 Cinder 볼륨을 제공하지 않는 것이다. 그래서 인스턴스는 기본적인 Host PC의 백엔드를 디스크 공간으로 사용 하게 된다.
2023.1 버전 설치 및 설정
동일하게 자동과 수동 버전이 있지만, 수동으로 하여 우리의 환경에 맞게 Customization을 진행 한다. 제일 먼저 최신 버전 OpenStack Snap을 설치 한다
sudo snap install openstack --channel 2023.1Sunbeam은 MicroStack을 사용하기 위해 필요한 종속성을 모두 설치하고 진행 할 수 있다. 바로 아래에 있는 명령어를 실행 하면 스크립트를 만들고 자동으로 실행 한다
sunbeam prepare-node-script | bash -x && newgrp snap_daemon이 스크립트는 호스트에서 특정 소프트웨어 요구 사항이 충족되도록 보장한다. openssh-server가 설치되어 있지 않은 경우 설치 하고, 현재 사용자에 대해 모든 명령에 대해 비밀번호 없이 sudo 권한을 구성한다 (NOPASSWD: ALL)
클러스터 부트스트랩 명령을 사용하여 OpenStack 클라우드를 배포한다.
# --role flag을 통해 MicroStack의 모든 요소들을 설치 하겠다고 지정 한다
sunbeam cluster bootstrap --role control --role compute --role storage
위 명령어 실행시 MetalLB 주소 할당 범위에 대한 입력이 요청된다. OpenStack API에 로컬 호스트 이외의 호스트에서 액세스하려는 경우, 이 IP 주소 범위는 기본 네트워크 인터페이스의 서브넷 내에 있어야 한다. 해당 범위에는 최소한 10개의 주소가 포함되어야 한다.
그 후 이제 전 버전과 동일하게 MicroStack 기본 설정 및 유저 지정 프롬프트가 진행 될것이다
# 기본 설정 프롬프트 진행을 하기 위해 명령어
sunbeam configure --openrc demo-openrc

Local or remote access to VMs [local/remote] (local): remote
CIDR of network to use for external networking (10.20.20.0/24): 192.168.1.0/24
IP address of default gateway for external network (192.168.1.1): 192.168.1.2
Populate OpenStack cloud with demo user, default images, flavors etc [y/n] (y):
Username to use for access to OpenStack (demo):
Password to use for access to OpenStack (hJ********):
Network range to use for project network (192.168.122.0/24):
Enable ping and SSH access to instances? [y/n] (y):
Start of IP allocation range for external network (192.168.1.2): 192.168.1.21
End of IP allocation range for external network (192.168.1.254): 192.168.1.57
Network type for access to external network [flat/vlan] (flat):
Writing openrc to demo-openrc ... done
Free network interface that will be configured for external traffic [ens34] (ens34):
모든 설정 후 라우터와 통신이 가능 한지 확인 작업을 위해 네트워크 인터페이스가 Router의 External 인터페이스에 연결 되어 있는지 확인 한다
# ens34 인터페이스 UP 상태로 전환
sudo ip link set up dev ens34

# br-ex에 ens34 인터페이스가 추가 되어 있는 것을 확인
sudo openstack-hypervisor.ovs-vsctl show
35c97266-ccfd-40a7-afb2-7672e7aa6158
    Bridge br-ex
        datapath_type: system
        Port ens34
            Interface ens34
        Port patch-provnet-20661610-1756-402f-8df8-4e027e639e2e-to-br-int
            Interface patch-provnet-20661610-1756-402f-8df8-4e027e639e2e-to-br-int
                type: patch
                options: {peer=patch-br-int-to-provnet-20661610-1756-402f-8df8-4e027e639e2e}
        Port br-ex
            Interface br-ex
                type: internal
    Bridge br-int
        fail_mode: secure
        datapath_type: system
        Port patch-br-int-to-provnet-20661610-1756-402f-8df8-4e027e639e2e
            Interface patch-br-int-to-provnet-20661610-1756-402f-8df8-4e027e639e2e
                type: patch
                options: {peer=patch-provnet-20661610-1756-402f-8df8-4e027e639e2e-to-br-int}
        Port br-int
            Interface br-int
                type: internal
    ovs_version: "3.1.0"


## 만약에 자동으로 추가가 안되어 있는 경우
sudo openstack-hypervisor.ovs-vsctl add-port br-ex ens34
이제 OpenStack Hypervisor 상태를 확인 하기 위해 admin 계정에 로그인을 해야 한다. 로그인을 하기 위해 먼저 사용자 계정 그리고 Admin 계정을 clouds.yaml 파일로 받아야 한다
# 사용자 계정 받기
sunbeam cloud-config -u -c sunbeam-demo
Writing cloud information to /home/ubuntu/.config/openstack/clouds.yaml ... done

# Admin 계정 받기
sunbeam cloud-config --admin -u -c sunbeam-admin
Writing cloud information to /home/ubuntu/.config/openstack/clouds.yaml ... done

# 이 경로 안에 있는 'admin' 계정 정보 확인
vi /home/ubuntu/.config/openstack/clouds.yaml

clouds:
  sunbeam-admin:
    auth:
      auth_url: http://192.168.1.6:80/openstack-keystone
      password: MqlcF4f4t3sp
      project_domain_name: admin_domain
      project_name: admin
      user_domain_name: admin_domain
      username: admin
  sunbeam-demo:
    auth:
      auth_url: http://192.168.1.6:80/openstack-keystone
      password: YBk9CX2est2b
      project_domain_name: users
      project_name: demo
      user_domain_name: users
      username: demo

sudo touch admin_openrc
sudo vi admin_openrc

# admin 계정 파일을 아래와 같은 포멧으로 입력
export OS_AUTH_URL=http://192.168.1.6:80/openstack-keystone
export OS_USERNAME=admin
export OS_PASSWORD=MqlcF4f4t3sp
export OS_USER_DOMAIN_NAME=admin_domain
export OS_PROJECT_DOMAIN_NAME=admin_domain
export OS_PROJECT_NAME=admin
export OS_AUTH_VERSION=3
export OS_IDENTITY_API_VERSION=3

# admin 계정으로 로그인
source admin_openrc
로그인 완료 후 Hypervisor 상태 확인
openstack hypervisor list
+--------------------------------------+---------------------+-----------------+--------------+-------+
| ID                                   | Hypervisor Hostname | Hypervisor Type | Host IP      | State |
+--------------------------------------+---------------------+-----------------+--------------+-------+
| d7a8e150-feee-4b12-bc04-9c4027afbc66 | ubuntu              | QEMU            | 192.168.1.80 | up    |
+--------------------------------------+---------------------+-----------------+--------------+-------+

openstack compute service list
+--------------------------------------+----------------+--------+----------+---------+-------+----------------------------+
| ID                                   | Binary         | Host   | Zone     | Status  | State | Updated At                 |
+--------------------------------------+----------------+--------+----------+---------+-------+----------------------------+
| a2b2918f-6493-466e-be6b-b109676da353 | nova-conductor | nova-0 | internal | enabled | up    | 2023-06-13T07:10:54.000000 |
| 78e06c73-e377-4eb3-bdd8-25311ea0e9c1 | nova-scheduler | nova-0 | internal | enabled | up    | 2023-06-13T07:10:53.000000 |
| ea690ec7-212c-4405-bc48-960abb0c1b57 | nova-compute   | ubuntu | nova     | enabled | up    | 2023-06-13T07:10:58.000000 |
+--------------------------------------+----------------+--------+----------+---------+-------+----------------------------+
라우터 IP 정보 확인 및 핑 테스트

ping 192.168.1.29
PING 192.168.1.29 (192.168.1.29) 56(84) bytes of data.
64 bytes from 192.168.1.29: icmp_seq=1 ttl=254 time=52.8 ms
64 bytes from 192.168.1.29: icmp_seq=2 ttl=254 time=0.704 ms
64 bytes from 192.168.1.29: icmp_seq=3 ttl=254 time=0.679 ms
2023.1/stable/vancouver 버전 설치 및 설정
현재 Vancouver 버전이 제일 최신 버전이고 Stable 버전이라고 한다. 설치 하는 방식은 전 버전인 2023.1 버전과 거의 동일 하다.
제일 먼저 OpenStack 스냅을 설치 하는 것이다
sudo snap install openstack --channel 2023.1/stable/vancouver전 버전과 동일하게 Sunbeam 스크립트를 사용 한다
sunbeam prepare-node-script | bash -x && newgrp snap_daemon그 후 Bootstrapping 작업을 동일 하게 진행 한다
sunbeam cluster bootstrap
Sunbeam Cluster not initialized
MetalLB address allocation range (10.20.21.10-10.20.21.20): 192.168.1.5-192.168.1.15
Node has been bootstrapped with roles: control, compute
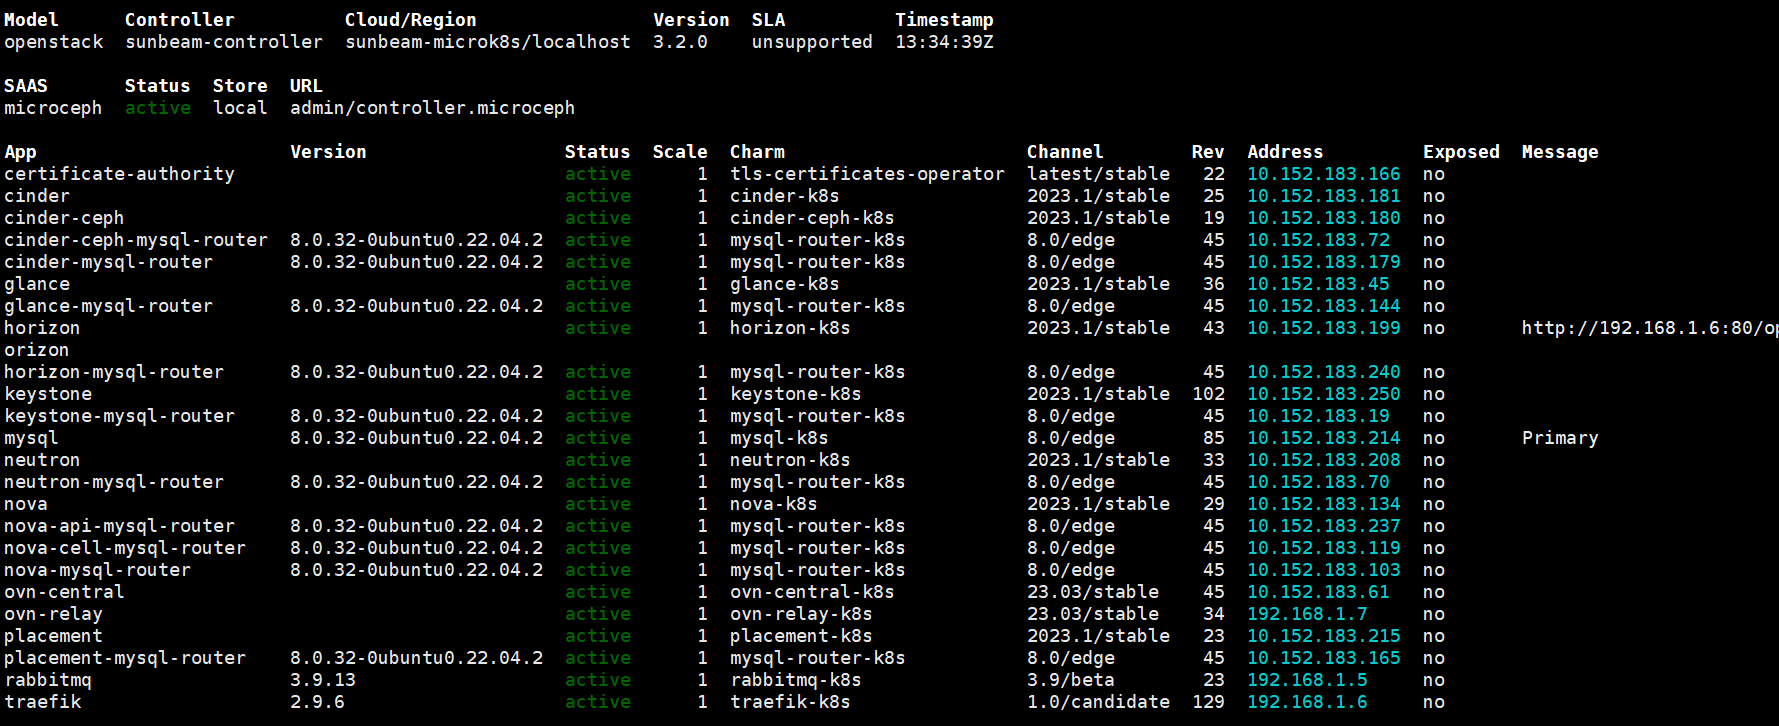
# 상태 확인
juju status -m openstack
Model Controller Cloud/Region Version SLA Timestamp
openstack sunbeam-controller sunbeam-microk8s/localhost 3.2.0 unsupported 08:34:42Z
App Version Status Scale Charm Channel Rev Address Exposed Message
certificate-authority active 1 tls-certificates-operator latest/stable 22 10.152.183.167 no
cinder active 1 cinder-k8s 2023.1/stable 25 10.152.183.131 no
cinder-ceph waiting 1 cinder-ceph-k8s 2023.1/stable 19 10.152.183.88 no installing agent
cinder-ceph-mysql-router 8.0.32-0ubuntu0.22.04.2 active 1 mysql-router-k8s 8.0/edge 45 10.152.183.181 no
cinder-mysql-router 8.0.32-0ubuntu0.22.04.2 active 1 mysql-router-k8s 8.0/edge 45 10.152.183.29 no
glance active 1 glance-k8s 2023.1/stable 36 10.152.183.33 no
glance-mysql-router 8.0.32-0ubuntu0.22.04.2 active 1 mysql-router-k8s 8.0/edge 45 10.152.183.61 no
horizon active 1 horizon-k8s 2023.1/stable 43 10.152.183.77 no http://192.168.1.5:80/openstack-horizon
horizon-mysql-router 8.0.32-0ubuntu0.22.04.2 active 1 mysql-router-k8s 8.0/edge 45 10.152.183.156 no
keystone active 1 keystone-k8s 2023.1/stable 102 10.152.183.233 no
keystone-mysql-router 8.0.32-0ubuntu0.22.04.2 active 1 mysql-router-k8s 8.0/edge 45 10.152.183.213 no
mysql 8.0.32-0ubuntu0.22.04.2 active 1 mysql-k8s 8.0/edge 85 10.152.183.241 no Primary
neutron active 1 neutron-k8s 2023.1/stable 33 10.152.183.69 no
neutron-mysql-router 8.0.32-0ubuntu0.22.04.2 active 1 mysql-router-k8s 8.0/edge 45 10.152.183.165 no
nova active 1 nova-k8s 2023.1/stable 29 10.152.183.119 no
nova-api-mysql-router 8.0.32-0ubuntu0.22.04.2 active 1 mysql-router-k8s 8.0/edge 45 10.152.183.240 no
nova-cell-mysql-router 8.0.32-0ubuntu0.22.04.2 active 1 mysql-router-k8s 8.0/edge 45 10.152.183.146 no
nova-mysql-router 8.0.32-0ubuntu0.22.04.2 active 1 mysql-router-k8s 8.0/edge 45 10.152.183.30 no
ovn-central active 1 ovn-central-k8s 23.03/stable 45 10.152.183.42 no
ovn-relay active 1 ovn-relay-k8s 23.03/stable 34 192.168.1.7 no
placement active 1 placement-k8s 2023.1/stable 23 10.152.183.169 no
placement-mysql-router 8.0.32-0ubuntu0.22.04.2 active 1 mysql-router-k8s 8.0/edge 45 10.152.183.243 no
rabbitmq 3.9.13 active 1 rabbitmq-k8s 3.9/beta 23 192.168.1.6 no
traefik 2.9.6 active 1 traefik-k8s 1.0/candidate 129 192.168.1.5 no
Unit Workload Agent Address Ports Message
certificate-authority/0* active idle 10.1.243.204
cinder-ceph-mysql-router/0* active idle 10.1.243.222
cinder-ceph/0* blocked idle 10.1.243.225 (ceph) integration missing
cinder-mysql-router/0* active idle 10.1.243.214
cinder/0* active idle 10.1.243.221
glance-mysql-router/0* active idle 10.1.243.208
glance/0* active idle 10.1.243.211
horizon-mysql-router/0* active idle 10.1.243.227
horizon/0* active idle 10.1.243.226
keystone-mysql-router/0* active idle 10.1.243.209
keystone/0* active idle 10.1.243.215
mysql/0* active idle 10.1.243.207 Primary
neutron-mysql-router/0* active idle 10.1.243.219
neutron/0* active idle 10.1.243.220
nova-api-mysql-router/0* active idle 10.1.243.232
nova-cell-mysql-router/0* active idle 10.1.243.233
nova-mysql-router/0* active idle 10.1.243.224
nova/0* active idle 10.1.243.217
ovn-central/0* active idle 10.1.243.231
ovn-relay/0* active idle 10.1.243.223
placement-mysql-router/0* active idle 10.1.243.230
placement/0* active idle 10.1.243.228
rabbitmq/0* active idle 10.1.243.218
traefik/0* active idle 10.1.243.205
Offer Application Charm Rev Connected Endpoint Interface Role
certificate-authority certificate-authority tls-certificates-operator 22 1/1 certificates tls-certificates provider
keystone keystone keystone-k8s 102 1/1 identity-credentials keystone-credentials provider
ovn-relay ovn-relay ovn-relay-k8s 34 1/1 ovsdb-cms-relay ovsdb-cms provider
rabbitmq rabbitmq rabbitmq-k8s 23 1/1 amqp rabbitmq provider
sunbeam 초기 설정도 마찬가지다
sunbeam configure --openrc demo-openrc

Local or remote access to VMs [local/remote] (local): remote
CIDR of network to use for external networking (10.20.20.0/24): 192.168.1.0/24
IP address of default gateway for external network (192.168.1.1): 192.168.1.2
Populate OpenStack cloud with demo user, default images, flavors etc [y/n] (y):
Username to use for access to OpenStack (demo):
Password to use for access to OpenStack (wk********):
Enable ping and SSH access to instances? [y/n] (y): y
Start of IP allocation range for external network (192.168.1.2): 192.168.1.18
End of IP allocation range for external network (192.168.1.254): 192.168.1.58
Writing openrc to demo-openrc ... done
여기서 다른 점은 demo 계정과 admin 계정을 clouds.yaml 형태로 받기 위해서 아래와 같이 진행 한다
sunbeam cloud-config -u -c sunbeam-demo
Writing cloud information to /home/ubuntu/.config/openstack/clouds.yaml ... done
sunbeam cloud-config --admin -u -c sunbeam-admin
Writing cloud information to /home/ubuntu/.config/openstack/clouds.yaml ... done
# 테스틍용 인스턴스 생성
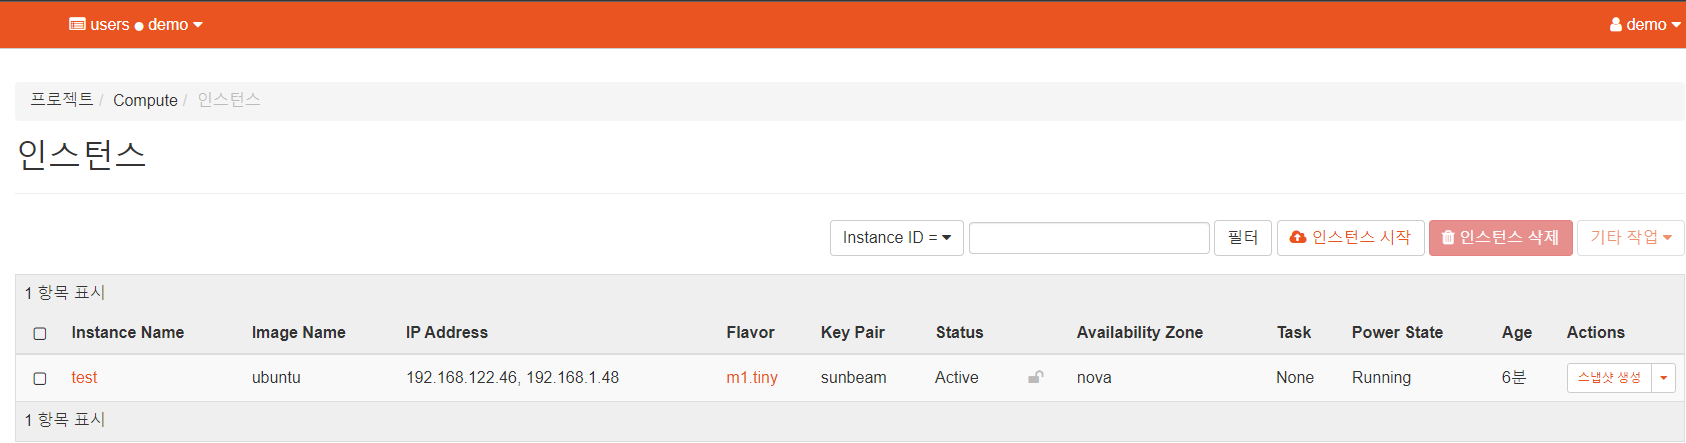
sunbeam launch ubuntu --name test
Launching an OpenStack instance ...
Access instance with `ssh -i /home/ubuntu/snap/openstack/177/sunbeam ubuntu@192.168.1.48`이제 OpenStack Dashboard을 접속 하기 위해 사용자 계정에 로그인을 해야 한다. 로그인을 하기 위해 전에 받은 demo 계정 정보를 확인 해야 한다
# 이 경로 안에 있는 'demo' 계정 정보 확인
vi /home/ubuntu/.config/openstack/clouds.yaml
clouds:
sunbeam-admin:
auth:
auth_url: http://192.168.1.6:80/openstack-keystone
password: MqlcF4f4t3sp
project_domain_name: admin_domain
project_name: admin
user_domain_name: admin_domain
username: admin
sunbeam-demo:
auth:
auth_url: http://192.168.1.6:80/openstack-keystone
password: YBk9CX2est2b
project_domain_name: users
project_name: demo
user_domain_name: users
username: demo
sudo touch demo_openrc
sudo vi demo_openrc
# admin 계정 파일을 아래와 같은 포멧으로 입력
export OS_AUTH_URL=http://192.168.1.6:80/openstack-keystone
export OS_USERNAME=demo
export OS_PASSWORD=YBk9CX2est2b
export OS_USER_DOMAIN_NAME=users
export OS_PROJECT_DOMAIN_NAME=users
export OS_PROJECT_NAME=demo
export OS_AUTH_VERSION=3
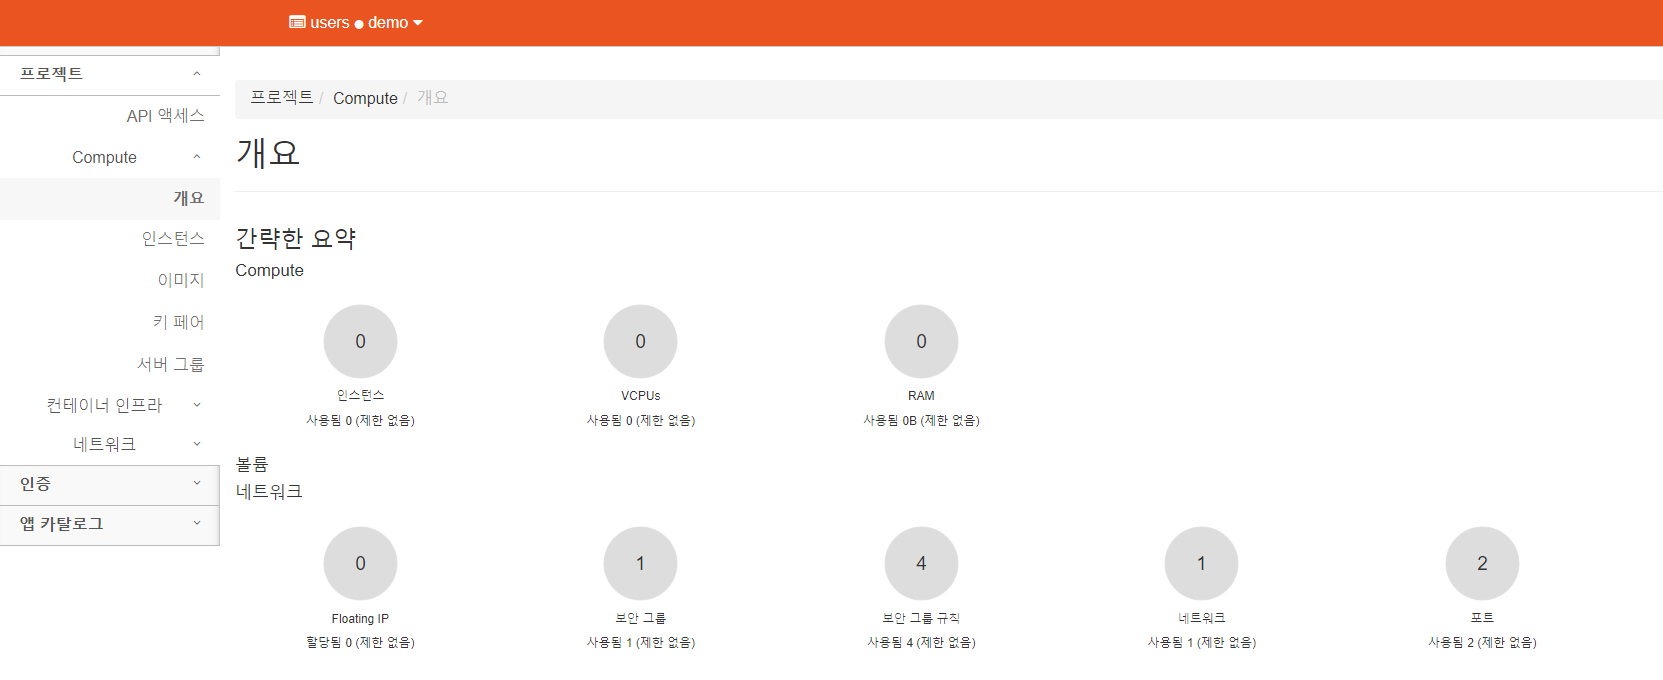
export OS_IDENTITY_API_VERSION=3실제로 Dashboard 들어가서 Floating IP자동 지정 및 인스턴스 Active 상태인 것을 확인 할 수 있다
하지만 현재 OpenStack쪽으로 통신은 안된다. 지정 해 준 네트워크 인터페이스를 열어 주지 않았기 때문이다.
ssh -i /home/ubuntu/snap/openstack/177/sunbeam ubuntu@192.168.1.48
ssh: connect to host 192.168.1.48 port 22: No route to host

# 통신 확인
ping 192.168.1.48
PING 192.168.1.48 (192.168.1.48) 56(84) bytes of data.
^C
--- 192.168.1.48 ping statistics ---
2 packets transmitted, 0 received, 100% packet loss, time 1024ms

# 인터페이스 확인
ip addr list | grep ens34
3: ens34: <BROADCAST,MULTICAST> mtu 1500 qdisc noop master ovs-system state DOWN group default qlen 1000

# 인터페이스 활성화
sudo ip link set up dev ens34

ip addr list | grep ens34
3: ens34: <BROADCAST,MULTICAST,UP,LOWER_UP> mtu 1500 qdisc fq_codel master ovs-system state UP group default qlen 1000

# OpenStack External과 Internal Network 경로 확인
sudo openstack-hypervisor.ovs-vsctl show
fe93cd59-4dcd-45e1-a606-d76739b03eb2
    Bridge br-ex
        datapath_type: system
        Port patch-provnet-d2eac88d-9fd6-4689-8a94-a7fa5ac03adc-to-br-int
            Interface patch-provnet-d2eac88d-9fd6-4689-8a94-a7fa5ac03adc-to-br-int
                type: patch
                options: {peer=patch-br-int-to-provnet-d2eac88d-9fd6-4689-8a94-a7fa5ac03adc}
        Port ens34					## 이미 br-ex (external)쪽 Port ens34가 추가 되어있다는 것을 확인 할 수 있다
            Interface ens34
        Port br-ex
            Interface br-ex
                type: internal
    Bridge br-int
        fail_mode: secure
        datapath_type: system
        Port patch-br-int-to-provnet-d2eac88d-9fd6-4689-8a94-a7fa5ac03adc
            Interface patch-br-int-to-provnet-d2eac88d-9fd6-4689-8a94-a7fa5ac03adc
                type: patch
                options: {peer=patch-provnet-d2eac88d-9fd6-4689-8a94-a7fa5ac03adc-to-br-int}
        Port br-int
            Interface br-int
                type: internal
        Port tap838cccd2-b0
            Interface tap838cccd2-b0
        Port tap95704853-2c
            Interface tap95704853-2c
        Port tapf8479b54-9b
            Interface tapf8479b54-9b
    ovs_version: "3.1.0"

# 라우터쪽 핑
ping 192.168.1.20
PING 192.168.1.20 (192.168.1.20) 56(84) bytes of data.
64 bytes from 192.168.1.20: icmp_seq=1 ttl=254 time=9.43 ms
64 bytes from 192.168.1.20: icmp_seq=2 ttl=254 time=0.491 ms
^C
--- 192.168.1.20 ping statistics ---
2 packets transmitted, 2 received, 0% packet loss, time 1002ms
rtt min/avg/max/mdev = 0.491/4.959/9.428/4.468 ms

# 인스턴스쪽으로 핑
ping 192.168.1.48
PING 192.168.1.48 (192.168.1.48) 56(84) bytes of data.
64 bytes from 192.168.1.48: icmp_seq=1 ttl=63 time=3.71 ms
64 bytes from 192.168.1.48: icmp_seq=2 ttl=63 time=1.02 ms
^C
--- 192.168.1.48 ping statistics ---
2 packets transmitted, 2 received, 0% packet loss, time 1001ms
rtt min/avg/max/mdev = 1.023/2.366/3.709/1.343 ms
인스턴스를 접속 해보자
ssh -i /home/ubuntu/snap/openstack/177/sunbeam ubuntu@192.168.1.48
The authenticity of host '192.168.1.48 (192.168.1.48)' can't be established.
ED25519 key fingerprint is SHA256:M4XzY/rHfGx7RaEwZx5RKt9v3/QnvG4YxegJSWzVc0c.
This key is not known by any other names
Are you sure you want to continue connecting (yes/no/[fingerprint])? yes
Warning: Permanently added '192.168.1.48' (ED25519) to the list of known hosts.
Welcome to Ubuntu 22.04.2 LTS (GNU/Linux 5.15.0-73-generic x86_64)

 * Documentation:  https://help.ubuntu.com
 * Management:     https://landscape.canonical.com
 * Support:        https://ubuntu.com/advantage

  System information as of Wed Jun 14 08:56:52 UTC 2023

  System load:  0.240234375       Processes:             86
  Usage of /:   38.3% of 3.70GB   Users logged in:       0
  Memory usage: 37%               IPv4 address for ens3: 192.168.122.46
  Swap usage:   0%

Expanded Security Maintenance for Applications is not enabled.

0 updates can be applied immediately.
.
.
.

ubuntu@test:~$
인스턴스 접속 문제 없이 잘 되고 있다. 인스턴스의 저장 공간을 확인 해보자. 총 4GB라는 스페이스가 있다.
df -h
Filesystem      Size  Used Avail Use% Mounted on
tmpfs            47M  980K   46M   3% /run
/dev/vda1       3.7G  1.5G  2.3G  39% /
tmpfs           234M     0  234M   0% /dev/shm
tmpfs           5.0M     0  5.0M   0% /run/lock
/dev/vda15      105M  6.1M   99M   6% /boot/efi
tmpfs            47M  4.0K   47M   1% /run/user/1000
Flavor 옵션을 살펴 보면. 기본적으로 Host PC의 디스크 공간을 활용하여 저장 공간을 부여 하는 것을 확인 할 수 있다.

한번 더 테스트 하기 위해 m1.small 인스턴스를 생성 하겠다. 새로운 인스턴스 생성과 Floating IP까지 연결 완료 후

위에 있는 Flavor 옵션들 차트를 보면 이 새로운 인스턴스는 디스크 공간이 30GB이어야 한다.
Floating IP 새로 부여 및 새로운 인스턴스와 연결까지 이미 완료된 상태이어서 바로 SSH 가능하다
ssh -i /home/ubuntu/snap/openstack/177/sunbeam ubuntu@192.168.1.24

ubuntu@test2:~$ df -h
Filesystem      Size  Used Avail Use% Mounted on
tmpfs           198M  980K  197M   1% /run
/dev/vda1        29G  1.5G   28G   5% /
tmpfs           988M     0  988M   0% /dev/shm
tmpfs           5.0M     0  5.0M   0% /run/lock
/dev/vda15      105M  6.1M   99M   6% /boot/efi
tmpfs           198M  4.0K  198M   1% /run/user/1000
기본적인 Flavor에 지정 되어 있는 Host PC의 디스크 공간을 쓰면서 인스턴스가 생성 되는 것을 확인 할 수 있다. 여기서 중요한 점은 아직 Volume 서비스를 설정 하지 않아서 사용 할 수 없다는 것이다.
MicroCeph 추가 후 다시 실행
MicroCeph Cinder Volume을 추가 하려면 Sunbeam Bootstrap 파트에서 아래와 같이 --role flag을 추가 해주면 된다
# Cluster Bootstrap 진행 명령어
sunbeam cluster bootstrap --role control --role compute --role storage
Sunbeam Cluster not initialized
MetalLB address allocation range (10.20.21.10-10.20.21.20): 192.168.1.5-192.168.1.15    					 		# 로드 밸런서 IP 주소 range
Disks to attach to MicroCeph (/dev/disk/by-id/ata-VMware_Virtual_SATA_CDRW_Drive_01000000000000000001): /dev/sdb  	# Ceph용 empty 디스크 경로
Node has been bootstrapped with roles: control, compute, storage

# microceph 디스크 추가 되었는지 확인
sudo microceph disk list
Disks configured in MicroCeph:
+-----+----------+-------------------------------------------------+
| OSD | LOCATION |                      PATH                       |
+-----+----------+-------------------------------------------------+
| 0   | ubuntu   | /dev/disk/by-path/pci-0000:00:10.0-scsi-0:0:1:0 |
+-----+----------+-------------------------------------------------+

# microceph 상태 확인
sudo microceph.ceph status
  cluster:
    id:     65c5195a-038e-4589-9ac3-25c886583a1e
    health: HEALTH_WARN
            3 pool(s) have no replicas configured

  services:
    mon: 1 daemons, quorum ubuntu (age 40m)
    mgr: ubuntu(active, since 40m)
    osd: 1 osds: 1 up (since 39m), 1 in (since 39m)

  data:
    pools:   3 pools, 161 pgs
    objects: 90 objects, 655 MiB
    usage:   683 MiB used, 19 GiB / 20 GiB avail
    pgs:     161 active+clean
MicroCeph 추가 설정 및 공식 Github 페이지는 여기서 확인
설치 완료 시 모든 서비스들이 정상적으로 Active 상태를 표시하는 것을 확인 할 수 있다
전 버전과 동일 하게 Sunbeam 초기 설정을 진행 한다
sunbeam configure --openrc demo-openrc
Local or remote access to VMs [local/remote] (local): remote
CIDR of network to use for external networking (10.20.20.0/24): 192.168.1.0/24
IP address of default gateway for external network (192.168.1.1): 192.168.1.2
Populate OpenStack cloud with demo user, default images, flavors etc [y/n] (y):
Username to use for access to OpenStack (demo):
Password to use for access to OpenStack (YB********):
Network range to use for project network (192.168.122.0/24):
Enable ping and SSH access to instances? [y/n] (y):
Start of IP allocation range for external network (192.168.1.2): 192.168.1.16
End of IP allocation range for external network (192.168.1.254): 192.168.1.58
Writing openrc to demo-openrc ... done
Dashboard을 접속하여 demo 유저로 로그인 한 후 새로운 Volume 생성

OpenStack CLI를 통해서도 Cinder 볼륨이 정상적으로 생성 및 작동 하는지를 확인 할 수 있다
# admin 계정 정보 'admin_openrc' 파일에 등록 후
source admin_openrc

# cinder-volume 확인
openstack volume service list
+------------------+---------------------------+------+---------+-------+----------------------------+
| Binary           | Host                      | Zone | Status  | State | Updated At                 |
+------------------+---------------------------+------+---------+-------+----------------------------+
| cinder-scheduler | cinder-0                  | nova | enabled | up    | 2023-06-14T13:52:32.000000 |
| cinder-volume    | cinder-ceph-0@cinder-ceph | nova | enabled | up    | 2023-06-14T13:52:32.000000 |
+------------------+---------------------------+------+---------+-------+----------------------------+