Kubectl AI
Kubectl AI는 오픈 소스 프로젝트로서 OpenAI GPT 모델을 사용 하여 쿠버네티스 manifest YAML파일들을 작성 해 주는 Kubectl 플러그인이다. Kubectl 플러그인은 쿠버네티스의 kubectl 명령어 도구를 확장하고 기능을 추가하는 확장 기능이다. Kubectl 플러그인은 새로운 사용자 지정 명령어를 추가하거나 기존 명령어의 동작을 변경하는 방식으로 기능을 제공 한다.
공식 Github 페이지는 링크도 존재 하여 설치 방식과 사용 방법이 나와 있다.
이 플러그인의 개발자는 이것을 개발 한 이유는 개발이나 테스트 중 무작위로 매니페스트 파일을 찾고 수집하는 것을 피하는 것 이라고 언급 했다
설치 방법
Kubectl AI 플러그인을 사용하기 위해 설치 작업을 살펴 보겠다. 깃 허브 페이지에 나와 있는 설치 방식을 따라하면 주로 Homebrew와 Krew를 통해 설치 할 수 있는 방식들이 나와 있다. Homebrew는 보통 MacOS기반 패키지 설치 할 수 있을때 도와 주는 툴이기 때문에 Kubectl의 플러그인 설치를 도와주는 플러그인 관리자인 Krew를 통해 설치 진행 하였다.
Krew를 사용하기 위해서는 먼저 Krew를 쿠버네티스 클러스터에 설치 해야 한다. 설치 방법은 공식 Krew 홈페이지의 Installing Krew 페이지에 나와 있는데로 따라 하였다.
쿠버네티스 마스터 노드 즉 Kubectl을 사용하는 노드에서 Krew 설치 작업을 실행 한다
첫 번째로 Git가 설치 되어 있어야 한다. Git가 있어만 Github에서 Kubectl AI 및 Krew 소스 코드를 가져 올 수 있기 때문이다.
# Red Hat 개열 리눅스에서 git 설치
dnf install git

# 우분투 개열 리눅스에서 git 설치 (root유저일 경우)
apt install git
설치 가 완료 되면 이제 Krew 플러그인 관리자를 설치 하는 명령어를 사용 한다 (공식 사이트에 나와 있는 그대로)
(
  set -x; cd "$(mktemp -d)" &&
  OS="$(uname | tr '[:upper:]' '[:lower:]')" &&
  ARCH="$(uname -m | sed -e 's/x86_64/amd64/' -e 's/\(arm\)\(64\)\?.*/\1\2/' -e 's/aarch64$/arm64/')" &&
  KREW="krew-${OS}_${ARCH}" &&
  curl -fsSLO "https://github.com/kubernetes-sigs/krew/releases/latest/download/${KREW}.tar.gz" &&
  tar zxvf "${KREW}.tar.gz" &&
  ./"${KREW}" install krew
)

# 설치 후 화면
++ mktemp -d
+ cd /tmp/tmp.sQZg2NfgQ0
++ uname
++ tr '[:upper:]' '[:lower:]'
+ OS=linux
++ uname -m
++ sed -e s/x86_64/amd64/ -e 's/\(arm\)\(64\)\?.*/\1\2/' -e 's/aarch64$/arm64/'
+ ARCH=amd64
+ KREW=krew-linux_amd64
+ curl -fsSLO https://github.com/kubernetes-sigs/krew/releases/latest/download/krew-linux_amd64.tar.gz
+ tar zxvf krew-linux_amd64.tar.gz
./LICENSE
./krew-linux_amd64
+ ./krew-linux_amd64 install krew
Adding "default" plugin index from https://github.com/kubernetes-sigs/krew-index.git.
Updated the local copy of plugin index.
Installing plugin: krew
Installed plugin: krew
\
 | Use this plugin:
 | 	kubectl krew
 | Documentation:
 | 	https://krew.sigs.k8s.io/
 | Caveats:
 | \
 |  | krew is now installed! To start using kubectl plugins, you need to add
 |  | krew's installation directory to your PATH:
 |  |
 |  |   * macOS/Linux:
 |  |     - Add the following to your ~/.bashrc or ~/.zshrc:
 |  |         export PATH="${KREW_ROOT:-$HOME/.krew}/bin:$PATH"
 |  |     - Restart your shell.
 |  |
 |  |   * Windows: Add %USERPROFILE%\.krew\bin to your PATH environment variable
 |  |
 |  | To list krew commands and to get help, run:
 |  |   $ kubectl krew
 |  | For a full list of available plugins, run:
 |  |   $ kubectl krew search
 |  |
 |  | You can find documentation at
 |  |   https://krew.sigs.k8s.io/docs/user-guide/quickstart/.
 | /
/
마지막으로 Krew를 사용하기 위해 Krew를 bash Shell PATH에 지정 해주는 작업을 진행 한다
# 환경 변수 PATH에 kubectl krew의 실행 경로를 추가 한다
export PATH="${KREW_ROOT:-$HOME/.krew}/bin:$PATH"
추가 후 Shell을 재 접속 하거나 source ~/.bashrc를 통해 Shell 설정들의 변경 사항들을 바로 적용 시킨다. Krew의 정상적 작동 여부를 확인 하기 위해:
kubectl krew

krew is the kubectl plugin manager.
Krew 플러그인 관리자가 정상적으로 작동 하는지를 확인 하였다. 이제 Krew index에 kubectl ai를 추가 해준다
# index는 Krew 플러그인에 대한 정보를 포함하는 저장소
# Krew에 새로운 플러그인 인덱스를 추가하는 명령어다
kubectl krew index add kubectl-ai https://github.com/sozercan/kubectl-ai

WARNING: You have added a new index from "https://github.com/sozercan/kubectl-ai"
The plugins in this index are not audited for security by the Krew maintainers.
Install them at your own risk.
마지막으로 설치 명령어를 사용 하면 Kubectl AI가 설치 된다
kubectl krew install kubectl-ai/kubectl-ai

Updated the local copy of plugin index.
Updated the local copy of plugin index "kubectl-ai".
Installing plugin: kubectl-ai
Installed plugin: kubectl-ai
\
 | Use this plugin:
 | 	kubectl kubectl-ai
 | Caveats:
 | \
 |  | This plugin requires an OpenAI key.
 | /
/
사용 방법
이제 kubectl AI 설치가 완료 되었으니, 사용을 하기 전에 OpenAI API키를 등록 해줘야 된다.
키 등록은 환경 변수를 통해 가능 하다. 아래 명령어 형태로 등록 하면 된다.
export OPENAI_API_KEY=<OpenAI 키>추가로 OpenAI GPT 모델을 선택 할 수 있다. 기본적으로는 gpt-3.5-turbo-0301 가 선택 되어 있다.
export OPENAI_DEPLOYMENT_NAME=<OpenAI GPT 모델 이름>현재로서 사용 가능한 모델들은:
code-davinci-002text-davinci-003gpt-3.5-turbogpt-3.5-turbo-0301(default)gpt-4-0314gpt-4-32k-0314
이제 kubectl AI를 사용 할 수 있는 기본적인 준비들은 완료 되었다.
테스팅을 위해 간단한 프롬프트를 진행 하겠다
# 명령어 끝에 프롬프트를 입력 해줘야 된다
kubectl kubectl-ai "create an nginx deployment with 3 replicas"
? Attempting to apply the following manifest:

apiVersion: apps/v1
kind: Deployment
metadata:
  name: nginx-deployment
spec:
  replicas: 3
  selector:
    matchLabels:
      app: nginx
  template:
    metadata:
      labels:
        app: nginx
    spec:
      containers:
      - name: nginx
        image: nginx:1.7.9
        ports:
        - containerPort: 80
Use the arrow keys to navigate: ↓ ↑ → ←
? Would you like to apply this? [Reprompt/Apply/Don't Apply]:
+   Reprompt
  ▸ Apply
    Don't Apply
여기서 중요한 포인트는 바로 이 매니페스트 YAML파일을 적용 시킬 수도 있지만 만약에 추가 설정이나 수정 사항이 있으면 바로 "Reprompt" 옵션을 선택 하여 수정 및 추가 설정을 할 수 있다
# replica 수를 2개로 줄이고 latest nginx 이미지를 사용하게 프롬프트
Reprompt: Use the latest nginx image and reduce the replica count to 2
✨ Attempting to apply the following manifest:

apiVersion: apps/v1
kind: Deployment
metadata:
  name: nginx-deployment
spec:
  replicas: 2				# 2개로 수정
  selector:
    matchLabels:
      app: nginx
  template:
    metadata:
      labels:
        app: nginx
    spec:
      containers:
      - name: nginx
        image: nginx:latest		# latest 이미지로 수정
        ports:
        - containerPort: 80
"Reprompt"는 무제한으로 가능 하니 한번 더 해서 Service Object도 같이 추가 하겠다
# nodeport 서비스 오브젝트를 추가 하기 위한 프롬프트
Reprompt: Include a service nodeport for the nginx deployment
✨ Attempting to apply the following manifest:
apiVersion: apps/v1
kind: Deployment
metadata:
  name: nginx-deployment
spec:
  replicas: 2
  selector:
    matchLabels:
      app: nginx
  template:
    metadata:
      labels:
        app: nginx
    spec:
      containers:
      - name: nginx
        image: nginx:latest
        ports:
        - containerPort: 80
---
apiVersion: v1
kind: Service
metadata:
  name: nginx-service
spec:
  type: NodePort
  selector:
    app: nginx
  ports:
  - protocol: TCP
    port: 80
    targetPort: 80
    nodePort: 30080
# 마지막 선택 옵션에서 Apply를 선택
✔ Apply
확인을 위해 get all 명령어를 사용 하였다
kubectl get all
# deployment 오브젝트 생성
NAME                                    READY   STATUS    RESTARTS   AGE
pod/nginx-deployment-6b7f675859-4477m   1/1     Running   0          5s
pod/nginx-deployment-6b7f675859-lshdw   1/1     Running   0          5s

# nginx nodeport 서비스 생성
NAME                    TYPE        CLUSTER-IP      EXTERNAL-IP   PORT(S)        AGE
service/kubernetes      ClusterIP   10.233.0.1      <none>        443/TCP        20h
service/nginx-service   NodePort    10.233.25.231   <none>        80:30080/TCP   5s

NAME                               READY   UP-TO-DATE   AVAILABLE   AGE
deployment.apps/nginx-deployment   2/2     2            2           5s

# 2개의 Replica 생성
NAME                                          DESIRED   CURRENT   READY   AGE
replicaset.apps/nginx-deployment-6b7f675859   2         2         2       5s
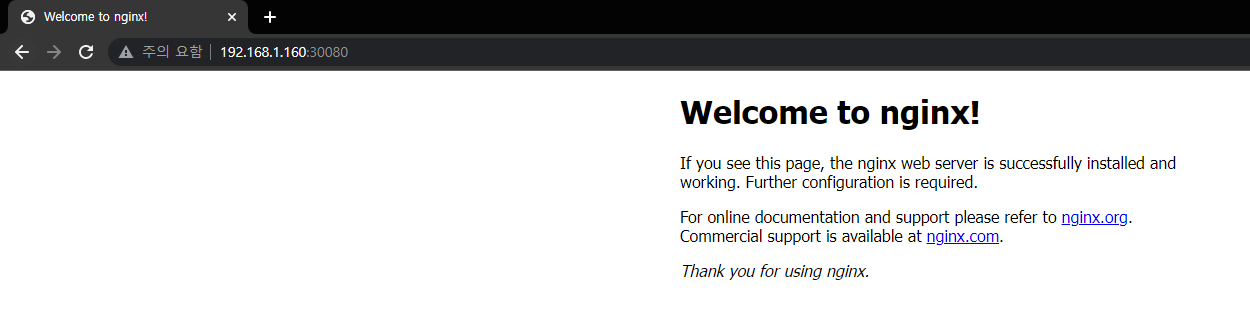
결과를 확인 하기 위해 30080포트로 이동 하였다
주의할 점은 해당 플러그인은 현재 클러스터의 상태를 알지 못한다. 따라서 항상 전체 매니페스트 파일을 생성한다.
Kubectl AI가 현재 클러스터 상태를 확인 할 수 없기 때문에 리소스 삭제나 변경 작업들은 아직 못 한다
