Kubesphere 클러스터 설치 (수정 중)
- 설치 요구 사항 (See Prerequisites site)
- Kubesphere 설치를 위한 준비 작업 (See Prerequisites site)
- Kubesphere 설치 방법
- Air gapped Installation
- Direct installation
작업 환경
💡 RockyKVM에서 실습 진행
- Ansible Node (RockyLinux 9.2): 192.168.122.103 + 30GiB x2 NFS용 추가 디스크
- Master Node (RockyLinux 9.2): 192.168.122.8
- Worker Node 1 (RockyLinux 9.2): 192.168.122.52
- Worker Node 2 (RockyLinux 9.2): 192.168.122.240
요구 사항
- 현재 KubeSphere Major 버전은 3.3으로 Kubernetes 클러스터의 버전은 v1.20.x, v1.21.x, v1.22.x, v1.23.x, 또는 v1.24.x 이어야 한다
쿠버네티스1.22 버전부터는 비호환성으로 인해 edge node의 일부 기능을 사용할 수 없다. 따라서 edge node를 사용하려면 Kubernetes v1.21.x 를 설치하는 것이 좋다.
edge node는 클러스터 컴퓨팅에서 다른 노드와의 통신을 위한 최종 사용자 포털/게이트웨이 역할을 하는 노드이다.
- x86_64 CPU만 지원되며, ARM CPU는 현재 완전히 지원되지 않는다
- Kubernetes 클러스터에 기본 StorageClass가 구성되어 있어야 한다.
kubectl get sc명령어를 사용하여 클러스터의 StorageClass 상태를 확인한다. 추가로 StorageClass는 Default class에 속 해야 한다.
Storage Class는 PV(Persistent Volume)을 동적으로 프로비저닝하기 위한 스토리지 유형과 해당 속성을 정의하는 구성.
KubeSphere 설치를 위한 준비 작업
쿠버네티스 클러스터 생성 작업은 이미 수동과 자동 방법으로 Wiki에 추가 되어있다.
바로가기:
Kubernetes v1.24 이상이면 특정 Kubesphere 서비스가 실행 되지 않으니 주의 할 것!
쿠버네티스 클러스터가 준비 된 후, 클러스터의 기본 StorageClass 및 PersistentVolume을 구성해야 한다.
그러기 위해 먼저 NFS를 Ansible 노드에서 설정을 하여 2개의 워커노드들이 각각 PV를 사용 할 수 있게 설정 해주는 작업을 실행 한다.
그러기
StorageClass를 지정하기 위한 Yaml 파일을 생성 한다
# Storage관련 YAML파일들을 분리 하기 위해 새로운 디렉터리 생성
mkdir Volume && cd Volume

# storageclass 생성을 위해 YAML 파일
vi storage.yml

apiVersion: storage.k8s.io/v1
kind: StorageClass
metadata:
  name: my-storage-class
  annotations:
    storageclass.kubernetes.io/is-default-class: "true"       # 기본 StorageClass이라고 지정
provisioner: kubernetes.io/no-provisioner
volumeBindingMode: WaitForFirstConsumer

# StorageClass 적용
kubectl apply -f storage.yml
storageclass.storage.k8s.io/my-storage-class created

# 적용 확인
kubectl get sc
NAME						PROVISIONER						RECLAIMPOLICY		VOLUMEBINDINGMODE		ALLOWVOLUMEEXPANSION		AGE
my-storage-class (default)	kubernetes.io/no-provisioner	Delete				WaitForFirstConsumer	false						10m
StorageClass를 적용 후 KubeSphere용 PV를 생성 해 줘야 한다.
# 첫 번째 pv 적용을 위해 YAML 파일
vi pv.yml

apiVersion: v1
kind: PersistentVolume
metadata:
  name: my-pv
spec:
  capacity:
    storage: 30Gi
  accessModes:
    - ReadWriteOnce
  persistentVolumeReclaimPolicy: Retain
  storageClassName: my-storage-class
  nfs:
    path: /k8s_data
    server: 192.168.122.103				# NFS server의 주소


# 두 번째 pv 적용을 위해 YAML 파일
vi pv2.yml

apiVersion: v1
kind: PersistentVolume
metadata:
  name: my-pv2
spec:
  capacity:
    storage: 30Gi
  accessModes:
    - ReadWriteOnce
  persistentVolumeReclaimPolicy: Retain
  storageClassName: my-storage-class
  nfs:
    path: /k8s_data2
    server: 192.168.122.103				# NFS server의 주소


# PV YAML 적용
kubectl apply -f pv.yml
kubectl apply -f pv2.yml
persistentvolume/my-pv created
persistentvolume/my-pv2 created

# PV 적용 상태 확인 명령어
kubectl get pv
NAME    CAPACITY   ACCESS MODES   RECLAIM POLICY   STATUS      CLAIM   STORAGECLASS       REASON   AGE
my-pv   30Gi       RWO            Retain           Available           my-storage-class            3s
my-pv2	30Gi	   RWO			  Retain		   Available		   my-storage-class			   3s
Installing on Top of Kubernetes
VER=$( curl --silent "https://api.github.com/repos/kubesphere/ks-installer/releases/latest"| grep '"tag_name"'|sed -E 's/.*"([^"]+)".*/\1/')
wget https://github.com/kubesphere/ks-installer/releases/download/$VER/kubesphere-installer.yaml
wget https://github.com/kubesphere/ks-installer/releases/download/$VER/cluster-configuration.yamlkubectl apply -f kubesphere-installer.yaml
kubectl apply -f cluster-configuration.yaml
Live 진행 현황 확인 하기 위해
kubectl logs -n kubesphere-system $(kubectl get pod -n kubesphere-system -l 'app in (ks-install, ks-installer)' -o jsonpath='{.items[0].metadata.name}') -fKVM kubesphere 접속 링크
http://kubesphere.spelix.co.kr
KVM에 설치 후:
로그 파일

kubesphere파드 상태

VMWare Local 에서 시도:
Same for VM we get Prometheus failure
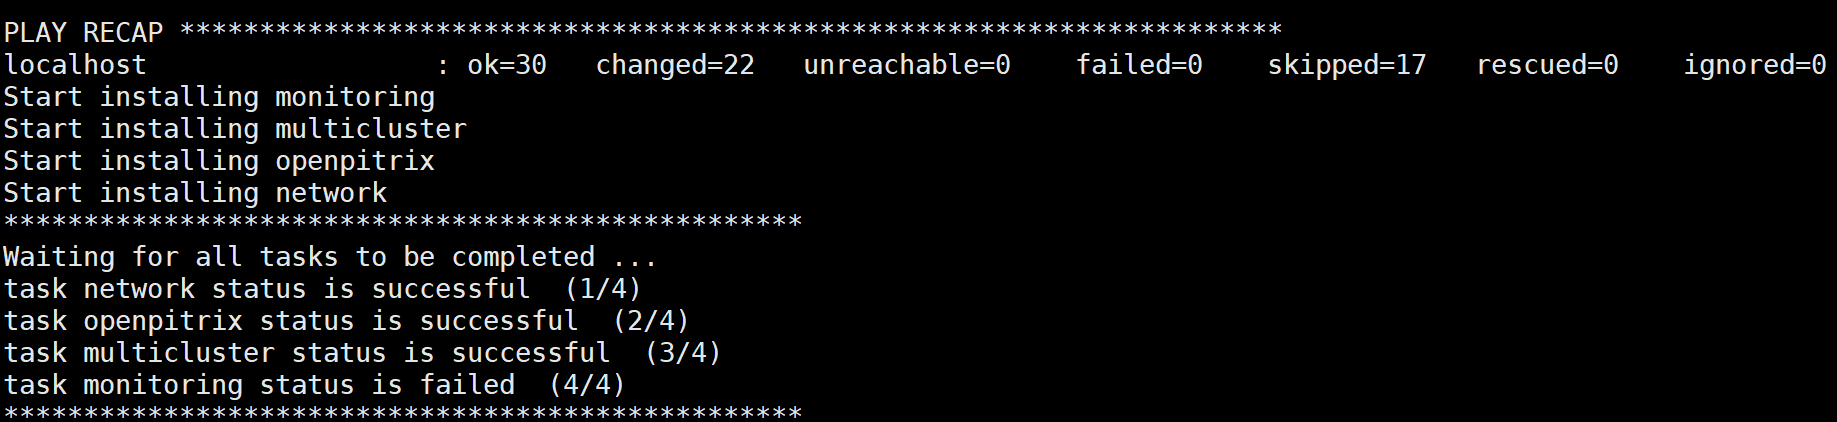
As Monitoring status failed, we can see
June 26 update:
As there was an issue with the monitoring system with k8s v1.26, I switched to k8s v1.24.6 and then installed KubeSphere. To which I got

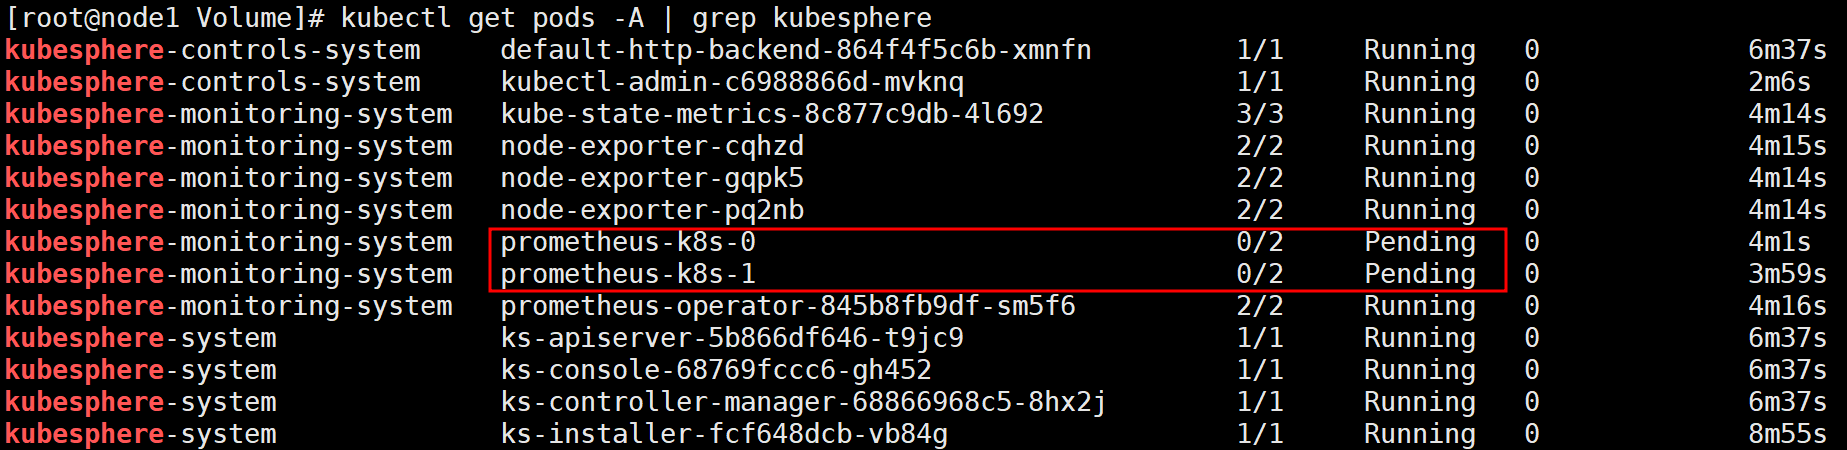
So it was a version issue. But if we check through CLI, we still get the Pending state for the monitoring system

So I Have set up a storage class (default) and a pv so that prometheus can use it.
kubectl get pv
NAME    CAPACITY   ACCESS MODES   RECLAIM POLICY   STATUS   CLAIM                                                             STORAGECLASS       REASON   AGE
my-pv   20Gi       RWO            Retain           Bound    kubesphere-monitoring-system/prometheus-k8s-db-prometheus-k8s-0   my-storage-class            21m

kubectl get pvc -A
NAMESPACE                      NAME                                 STATUS   VOLUME   CAPACITY   ACCESS MODES   STORAGECLASS       AGE
kubesphere-monitoring-system   prometheus-k8s-db-prometheus-k8s-0   Bound    my-pv    20Gi       RWO            my-storage-class   14m
The problem is that the pod looks like this currently
kubectl get pods -n kubesphere-monitoring-system
NAME                                               READY   STATUS                       RESTARTS   AGE
alertmanager-main-0                                2/2     Running                      0          20m
kube-state-metrics-6f6ffbf895-c28hf                3/3     Running                      0          20m
node-exporter-22fdn                                2/2     Running                      0          20m
node-exporter-96gmd                                2/2     Running                      0          20m
notification-manager-deployment-77d5b49896-9lt48   2/2     Running                      0          18m
notification-manager-operator-66c6967d78-bj2ms     2/2     Running                      0          19m
prometheus-k8s-0                                   1/2     CreateContainerConfigError   0          20m
prometheus-operator-b56bb98c4-l4cvp                2/2     Running                      0          20m
6월 27일 Fixed the issue
So the issue was that I was using a PV inside the master node which is useless... As the Prometheus pod was being created on worker nodes. Furthermore I was using a local volume as a PV so naturally the Pod wasn't being created and kept stuck in CreateContainerConfigError. It was all because it couldn't find the /mnt/data directory in the Worker node as I was only setting it up on the Master node.
Right after I realized that, I created a new disk and did a partition as following:
Checking if the parted is available
dnf install parted
lsblk
NAME MAJ:MIN RM SIZE RO TYPE MOUNTPOINT
sda 8:0 0 30G 0 disk
├─sda1 8:1 0 1G 0 part /boot
└─sda2 8:2 0 29G 0 part
├─centos-root 253:0 0 27G 0 lvm /
└─centos-swap 253:1 0 2G 0 lvm
sdb 8:16 0 20G 0 disk
We need to create a new partition for this new disk first
parted /dev/sdb mklabel gpt
parted -a opt /dev/sdb mkpart primary ext4 0% 100%
Then we will have
lsblk
NAME MAJ:MIN RM SIZE RO TYPE MOUNTPOINT
sda 8:0 0 30G 0 disk
├─sda1 8:1 0 1G 0 part /boot
└─sda2 8:2 0 29G 0 part
├─centos-root 253:0 0 27G 0 lvm /
└─centos-swap 253:1 0 2G 0 lvm
sdb 8:16 0 20G 0 disk
└─sdb1 8:17 0 20G 0 part
We need to mount it now after initializing the ext4 filesystem
sudo mkfs.ext4 -L datapartition /dev/sdb1
Creating a new directory to mount the sdb1 partition into
mkdir -p /mnt/data
vi /etc/fstab
#
# /etc/fstab
# Created by anaconda on Sun May 28 22:20:18 2023
#
# Accessible filesystems, by reference, are maintained under '/dev/disk'
# See man pages fstab(5), findfs(8), mount(8) and/or blkid(8) for more info
#
/dev/mapper/centos-root / xfs defaults 0 0
UUID=a62c5978-cbea-4cc0-8d4f-5d0ed5cb751f /boot xfs defaults 0 0
#/dev/mapper/centos-swap swap swap defaults 0 0
/dev/sdb1 /mnt/data ext4 defaults 0 0
그 후 mount 작업
mount -a
확인 진행
lsblk
NAME MAJ:MIN RM SIZE RO TYPE MOUNTPOINT
sda 8:0 0 30G 0 disk
├─sda1 8:1 0 1G 0 part /boot
└─sda2 8:2 0 29G 0 part
├─centos-root 253:0 0 27G 0 lvm /
└─centos-swap 253:1 0 2G 0 lvm
sdb 8:16 0 20G 0 disk
└─sdb1 8:17 0 20G 0 part /mnt/data
sr0 11:0 1 973M 0 rom
PV와 PVC 확인 결과
kubectl get sc
NAME                         PROVISIONER                    RECLAIMPOLICY   VOLUMEBINDINGMODE      ALLOWVOLUMEEXPANSION   AGE
my-storage-class (default)   kubernetes.io/no-provisioner   Delete          WaitForFirstConsumer   false                  100m


kubectl get pv
NAME    CAPACITY   ACCESS MODES   RECLAIM POLICY   STATUS   CLAIM                                                             STORAGECLASS       REASON   AGE
my-pv   20Gi       RWO            Retain           Bound    kubesphere-monitoring-system/prometheus-k8s-db-prometheus-k8s-0   my-storage-class            77m


kubectl get pvc -A
NAMESPACE                      NAME                                 STATUS   VOLUME   CAPACITY   ACCESS MODES   STORAGECLASS       AGE
kubesphere-monitoring-system   prometheus-k8s-db-prometheus-k8s-0   Bound    my-pv    20Gi       RWO            my-storage-class   96m
Instead of using the above way. I have just create a NFS server to be used within the Ansible Server. For KVM, we have an Ansible server that will work as NFS server as well. I added 2 30GiB disks and followed the below:
kind: PersistentVolume
metadata:
name: my-pv
spec:
capacity:
storage: 20Gi
accessModes:
- ReadWriteOnce
persistentVolumeReclaimPolicy: Retain
storageClassName: my-storage-class
nfs:
path: /mnt/data
server: 192.168.1.90
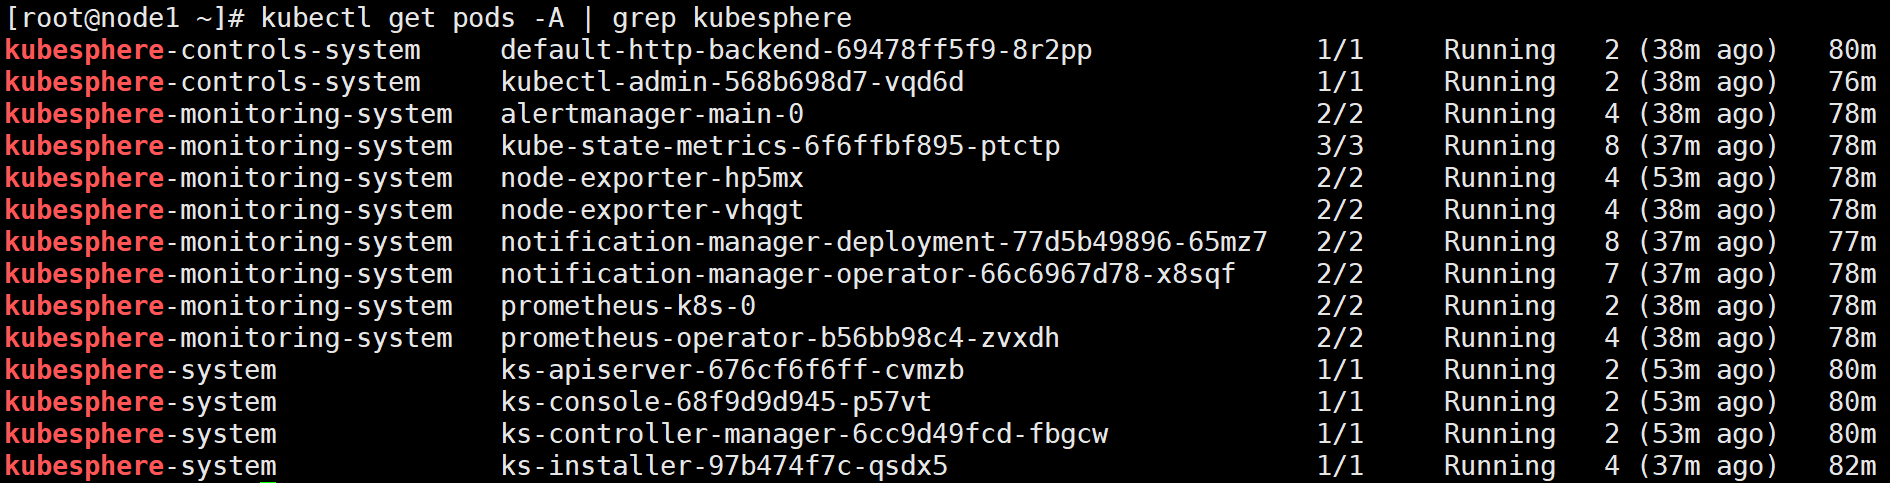
But we can easily go to Web ui.

We can see that the ks console is running on 30880 port with a nodeport svc type so we can basically use any ip of our cluster nodes with the port number.
The result:

The default credentials is:
admin/P@88w0rd
After initial login we can see

After logging in,

We can see the on the top left corner, there is a 'platform' option. Upon clicking that we will be greeted with:

If we check 'cluster management':

If we check our nodes:

We can see that our K8s cluster nodes can be seen. The monitoring screen can also be accessed and many other features are available.
KVM에서의 현재 이슈...
When attempting to change the password, I get this error????
Not happening in my own laptop's VM..?
Internal error occurred: failed calling webhook "users.iam.kubesphere.io": failed to call webhook: Post "https://ks-controller-manager.kubesphere-system.svc:443/validate-email-iam-kubesphere-io-v1alpha2?timeout=30s": net/http: request canceled while waiting for connection (Client.Timeout exceeded while awaiting headers)
위 이슈 해결 함
Just enter this:
kubectl delete -A ValidatingWebhookConfiguration users.iam.kubesphere.io
This will remove the Validating Webhook entirely which is used for SSL/TLS communications.
그리고
Monitoring 파드들은 문제 없이 돌아가는데 왜 Dashboard상 Metric을 안 보여주는지 확인 해야 할 듯.. <- 이제 된다? 또 안됨? 내일 봐야 할듯