2023.1/stable/vancouver 버전 설치 및 설정
현재 Vancouver 버전이 제일 최신 버전이고 Stable 버전이라고 한다. 설치 하는 방식은 전 버전인 2023.1 버전과 거의 동일 하다.
제일 먼저 OpenStack 스냅을 설치 하는 것이다
sudo snap install openstack --channel 2023.1/stable/vancouver전 버전과 동일하게 Sunbeam 스크립트를 사용 한다
sunbeam prepare-node-script | bash -x && newgrp snap_daemon그 후 Bootstrapping 작업을 동일 하게 진행 한다
sunbeam cluster bootstrap
Sunbeam Cluster not initialized
MetalLB address allocation range (10.20.21.10-10.20.21.20): 192.168.1.5-192.168.1.15
Node has been bootstrapped with roles: control, compute
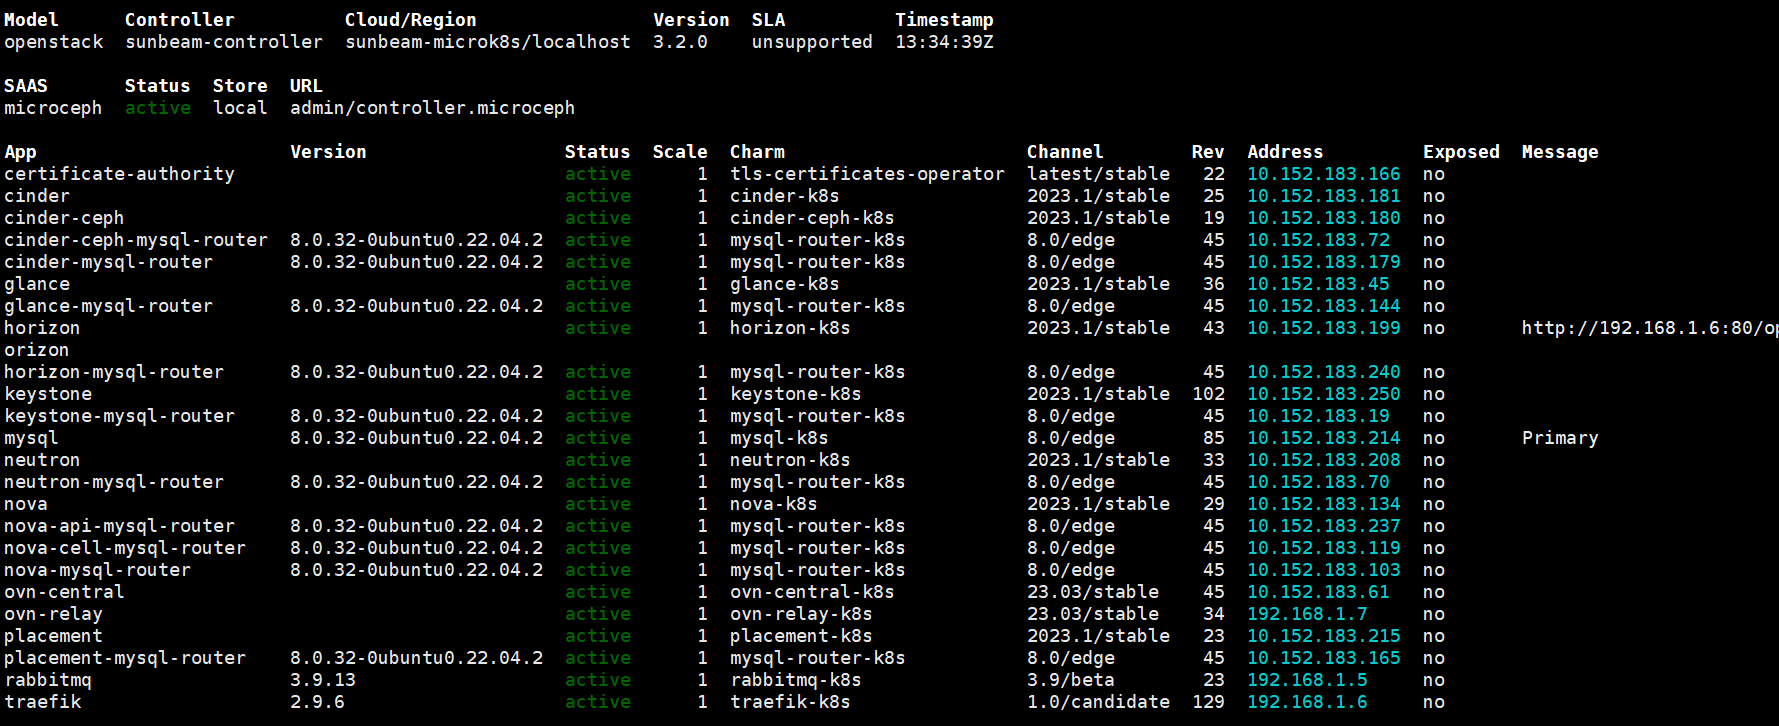
# 상태 확인
juju status -m openstack
Model Controller Cloud/Region Version SLA Timestamp
openstack sunbeam-controller sunbeam-microk8s/localhost 3.2.0 unsupported 08:34:42Z
App Version Status Scale Charm Channel Rev Address Exposed Message
certificate-authority active 1 tls-certificates-operator latest/stable 22 10.152.183.167 no
cinder active 1 cinder-k8s 2023.1/stable 25 10.152.183.131 no
cinder-ceph waiting 1 cinder-ceph-k8s 2023.1/stable 19 10.152.183.88 no installing agent
cinder-ceph-mysql-router 8.0.32-0ubuntu0.22.04.2 active 1 mysql-router-k8s 8.0/edge 45 10.152.183.181 no
cinder-mysql-router 8.0.32-0ubuntu0.22.04.2 active 1 mysql-router-k8s 8.0/edge 45 10.152.183.29 no
glance active 1 glance-k8s 2023.1/stable 36 10.152.183.33 no
glance-mysql-router 8.0.32-0ubuntu0.22.04.2 active 1 mysql-router-k8s 8.0/edge 45 10.152.183.61 no
horizon active 1 horizon-k8s 2023.1/stable 43 10.152.183.77 no http://192.168.1.5:80/openstack-horizon
horizon-mysql-router 8.0.32-0ubuntu0.22.04.2 active 1 mysql-router-k8s 8.0/edge 45 10.152.183.156 no
keystone active 1 keystone-k8s 2023.1/stable 102 10.152.183.233 no
keystone-mysql-router 8.0.32-0ubuntu0.22.04.2 active 1 mysql-router-k8s 8.0/edge 45 10.152.183.213 no
mysql 8.0.32-0ubuntu0.22.04.2 active 1 mysql-k8s 8.0/edge 85 10.152.183.241 no Primary
neutron active 1 neutron-k8s 2023.1/stable 33 10.152.183.69 no
neutron-mysql-router 8.0.32-0ubuntu0.22.04.2 active 1 mysql-router-k8s 8.0/edge 45 10.152.183.165 no
nova active 1 nova-k8s 2023.1/stable 29 10.152.183.119 no
nova-api-mysql-router 8.0.32-0ubuntu0.22.04.2 active 1 mysql-router-k8s 8.0/edge 45 10.152.183.240 no
nova-cell-mysql-router 8.0.32-0ubuntu0.22.04.2 active 1 mysql-router-k8s 8.0/edge 45 10.152.183.146 no
nova-mysql-router 8.0.32-0ubuntu0.22.04.2 active 1 mysql-router-k8s 8.0/edge 45 10.152.183.30 no
ovn-central active 1 ovn-central-k8s 23.03/stable 45 10.152.183.42 no
ovn-relay active 1 ovn-relay-k8s 23.03/stable 34 192.168.1.7 no
placement active 1 placement-k8s 2023.1/stable 23 10.152.183.169 no
placement-mysql-router 8.0.32-0ubuntu0.22.04.2 active 1 mysql-router-k8s 8.0/edge 45 10.152.183.243 no
rabbitmq 3.9.13 active 1 rabbitmq-k8s 3.9/beta 23 192.168.1.6 no
traefik 2.9.6 active 1 traefik-k8s 1.0/candidate 129 192.168.1.5 no
Unit Workload Agent Address Ports Message
certificate-authority/0* active idle 10.1.243.204
cinder-ceph-mysql-router/0* active idle 10.1.243.222
cinder-ceph/0* blocked idle 10.1.243.225 (ceph) integration missing
cinder-mysql-router/0* active idle 10.1.243.214
cinder/0* active idle 10.1.243.221
glance-mysql-router/0* active idle 10.1.243.208
glance/0* active idle 10.1.243.211
horizon-mysql-router/0* active idle 10.1.243.227
horizon/0* active idle 10.1.243.226
keystone-mysql-router/0* active idle 10.1.243.209
keystone/0* active idle 10.1.243.215
mysql/0* active idle 10.1.243.207 Primary
neutron-mysql-router/0* active idle 10.1.243.219
neutron/0* active idle 10.1.243.220
nova-api-mysql-router/0* active idle 10.1.243.232
nova-cell-mysql-router/0* active idle 10.1.243.233
nova-mysql-router/0* active idle 10.1.243.224
nova/0* active idle 10.1.243.217
ovn-central/0* active idle 10.1.243.231
ovn-relay/0* active idle 10.1.243.223
placement-mysql-router/0* active idle 10.1.243.230
placement/0* active idle 10.1.243.228
rabbitmq/0* active idle 10.1.243.218
traefik/0* active idle 10.1.243.205
Offer Application Charm Rev Connected Endpoint Interface Role
certificate-authority certificate-authority tls-certificates-operator 22 1/1 certificates tls-certificates provider
keystone keystone keystone-k8s 102 1/1 identity-credentials keystone-credentials provider
ovn-relay ovn-relay ovn-relay-k8s 34 1/1 ovsdb-cms-relay ovsdb-cms provider
rabbitmq rabbitmq rabbitmq-k8s 23 1/1 amqp rabbitmq provider
sunbeam 초기 설정도 마찬가지다
sunbeam configure --openrc demo-openrc

Local or remote access to VMs [local/remote] (local): remote
CIDR of network to use for external networking (10.20.20.0/24): 192.168.1.0/24
IP address of default gateway for external network (192.168.1.1): 192.168.1.2
Populate OpenStack cloud with demo user, default images, flavors etc [y/n] (y):
Username to use for access to OpenStack (demo):
Password to use for access to OpenStack (wk********):
Enable ping and SSH access to instances? [y/n] (y): y
Start of IP allocation range for external network (192.168.1.2): 192.168.1.18
End of IP allocation range for external network (192.168.1.254): 192.168.1.58
Writing openrc to demo-openrc ... done
여기서 다른 점은 demo 계정과 admin 계정을 clouds.yaml 형태로 받기 위해서 아래와 같이 진행 한다
sunbeam cloud-config -u -c sunbeam-demo
Writing cloud information to /home/ubuntu/.config/openstack/clouds.yaml ... done

sunbeam cloud-config --admin -u -c sunbeam-admin
Writing cloud information to /home/ubuntu/.config/openstack/clouds.yaml ... done

# 테스틍용 인스턴스 생성
sunbeam launch ubuntu --name test
Launching an OpenStack instance ...
Access instance with `ssh -i /home/ubuntu/snap/openstack/177/sunbeam ubuntu@192.168.1.48`
이제 OpenStack Dashboard을 접속 하기 위해 사용자 계정에 로그인을 해야 한다. 로그인을 하기 위해 전에 받은 demo 계정 정보를 확인 해야 한다
# 이 경로 안에 있는 'demo' 계정 정보 확인
vi /home/ubuntu/.config/openstack/clouds.yaml
clouds:
sunbeam-admin:
auth:
auth_url: http://192.168.1.6:80/openstack-keystone
password: MqlcF4f4t3sp
project_domain_name: admin_domain
project_name: admin
user_domain_name: admin_domain
username: admin
sunbeam-demo:
auth:
auth_url: http://192.168.1.6:80/openstack-keystone
password: YBk9CX2est2b
project_domain_name: users
project_name: demo
user_domain_name: users
username: demo
sudo touch demo_openrc
sudo vi demo_openrc
# admin 계정 파일을 아래와 같은 포멧으로 입력
export OS_AUTH_URL=http://192.168.1.6:80/openstack-keystone
export OS_USERNAME=demo
export OS_PASSWORD=YBk9CX2est2b
export OS_USER_DOMAIN_NAME=users
export OS_PROJECT_DOMAIN_NAME=users
export OS_PROJECT_NAME=demo
export OS_AUTH_VERSION=3
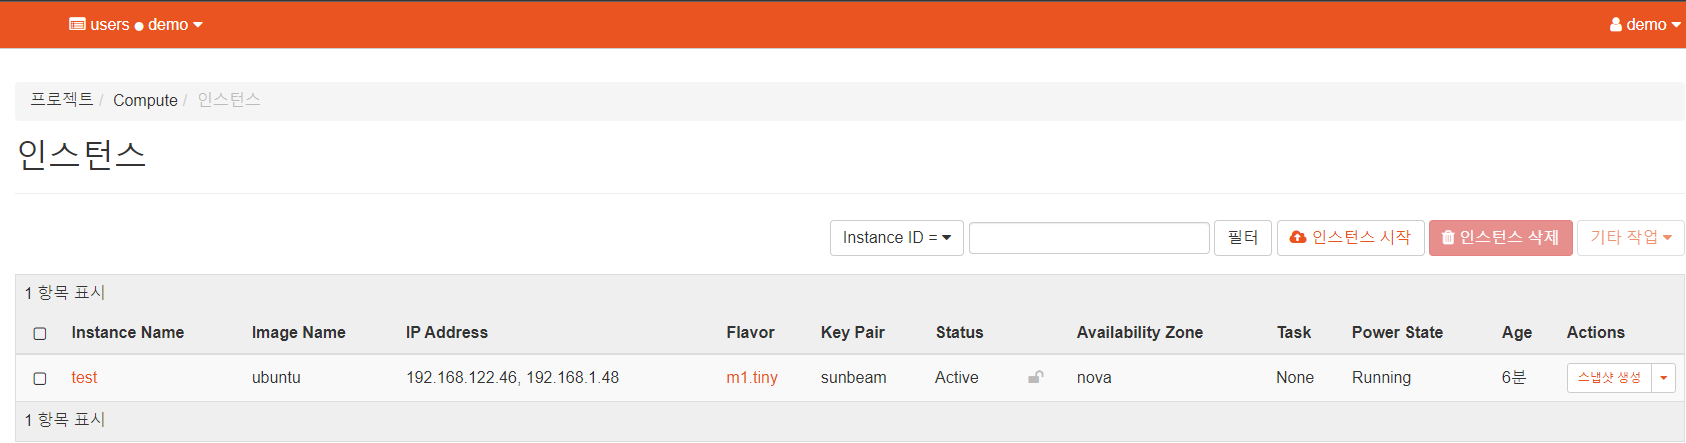
export OS_IDENTITY_API_VERSION=3실제로 Dashboard 들어가서 Floating IP자동 지정 및 인스턴스 Active 상태인 것을 확인 할 수 있다
하지만 현재 OpenStack쪽으로 통신은 안된다. 지정 해 준 네트워크 인터페이스를 열어 주지 않았기 때문이다.
ssh -i /home/ubuntu/snap/openstack/177/sunbeam ubuntu@192.168.1.48
ssh: connect to host 192.168.1.48 port 22: No route to host

# 통신 확인
ping 192.168.1.48
PING 192.168.1.48 (192.168.1.48) 56(84) bytes of data.
^C
--- 192.168.1.48 ping statistics ---
2 packets transmitted, 0 received, 100% packet loss, time 1024ms

# 인터페이스 확인
ip addr list | grep ens34
3: ens34: <BROADCAST,MULTICAST> mtu 1500 qdisc noop master ovs-system state DOWN group default qlen 1000

# 인터페이스 활성화
sudo ip link set up dev ens34

ip addr list | grep ens34
3: ens34: <BROADCAST,MULTICAST,UP,LOWER_UP> mtu 1500 qdisc fq_codel master ovs-system state UP group default qlen 1000

# OpenStack External과 Internal Network 경로 확인
sudo openstack-hypervisor.ovs-vsctl show
fe93cd59-4dcd-45e1-a606-d76739b03eb2
    Bridge br-ex
        datapath_type: system
        Port patch-provnet-d2eac88d-9fd6-4689-8a94-a7fa5ac03adc-to-br-int
            Interface patch-provnet-d2eac88d-9fd6-4689-8a94-a7fa5ac03adc-to-br-int
                type: patch
                options: {peer=patch-br-int-to-provnet-d2eac88d-9fd6-4689-8a94-a7fa5ac03adc}
        Port ens34					## 이미 br-ex (external)쪽 Port ens34가 추가 되어있다는 것을 확인 할 수 있다
            Interface ens34
        Port br-ex
            Interface br-ex
                type: internal
    Bridge br-int
        fail_mode: secure
        datapath_type: system
        Port patch-br-int-to-provnet-d2eac88d-9fd6-4689-8a94-a7fa5ac03adc
            Interface patch-br-int-to-provnet-d2eac88d-9fd6-4689-8a94-a7fa5ac03adc
                type: patch
                options: {peer=patch-provnet-d2eac88d-9fd6-4689-8a94-a7fa5ac03adc-to-br-int}
        Port br-int
            Interface br-int
                type: internal
        Port tap838cccd2-b0
            Interface tap838cccd2-b0
        Port tap95704853-2c
            Interface tap95704853-2c
        Port tapf8479b54-9b
            Interface tapf8479b54-9b
    ovs_version: "3.1.0"

# 라우터쪽 핑
ping 192.168.1.20
PING 192.168.1.20 (192.168.1.20) 56(84) bytes of data.
64 bytes from 192.168.1.20: icmp_seq=1 ttl=254 time=9.43 ms
64 bytes from 192.168.1.20: icmp_seq=2 ttl=254 time=0.491 ms
^C
--- 192.168.1.20 ping statistics ---
2 packets transmitted, 2 received, 0% packet loss, time 1002ms
rtt min/avg/max/mdev = 0.491/4.959/9.428/4.468 ms

# 인스턴스쪽으로 핑
ping 192.168.1.48
PING 192.168.1.48 (192.168.1.48) 56(84) bytes of data.
64 bytes from 192.168.1.48: icmp_seq=1 ttl=63 time=3.71 ms
64 bytes from 192.168.1.48: icmp_seq=2 ttl=63 time=1.02 ms
^C
--- 192.168.1.48 ping statistics ---
2 packets transmitted, 2 received, 0% packet loss, time 1001ms
rtt min/avg/max/mdev = 1.023/2.366/3.709/1.343 ms
인스턴스를 접속 해보자
ssh -i /home/ubuntu/snap/openstack/177/sunbeam ubuntu@192.168.1.48
The authenticity of host '192.168.1.48 (192.168.1.48)' can't be established.
ED25519 key fingerprint is SHA256:M4XzY/rHfGx7RaEwZx5RKt9v3/QnvG4YxegJSWzVc0c.
This key is not known by any other names
Are you sure you want to continue connecting (yes/no/[fingerprint])? yes
Warning: Permanently added '192.168.1.48' (ED25519) to the list of known hosts.
Welcome to Ubuntu 22.04.2 LTS (GNU/Linux 5.15.0-73-generic x86_64)

 * Documentation:  https://help.ubuntu.com
 * Management:     https://landscape.canonical.com
 * Support:        https://ubuntu.com/advantage

  System information as of Wed Jun 14 08:56:52 UTC 2023

  System load:  0.240234375       Processes:             86
  Usage of /:   38.3% of 3.70GB   Users logged in:       0
  Memory usage: 37%               IPv4 address for ens3: 192.168.122.46
  Swap usage:   0%

Expanded Security Maintenance for Applications is not enabled.

0 updates can be applied immediately.
.
.
.

ubuntu@test:~$
인스턴스 접속 문제 없이 잘 되고 있다. 인스턴스의 저장 공간을 확인 해보자. 총 4GB라는 스페이스가 있다.
df -h
Filesystem      Size  Used Avail Use% Mounted on
tmpfs            47M  980K   46M   3% /run
/dev/vda1       3.7G  1.5G  2.3G  39% /
tmpfs           234M     0  234M   0% /dev/shm
tmpfs           5.0M     0  5.0M   0% /run/lock
/dev/vda15      105M  6.1M   99M   6% /boot/efi
tmpfs            47M  4.0K   47M   1% /run/user/1000
Flavor 옵션을 살펴 보면. 기본적으로 Host PC의 디스크 공간을 활용하여 저장 공간을 부여 하는 것을 확인 할 수 있다.

한번 더 테스트 하기 위해 m1.small 인스턴스를 생성 하겠다. 새로운 인스턴스 생성과 Floating IP까지 연결 완료 후

위에 있는 Flavor 옵션들 차트를 보면 이 새로운 인스턴스는 디스크 공간이 30GB이어야 한다.
Floating IP 새로 부여 및 새로운 인스턴스와 연결까지 이미 완료된 상태이어서 바로 SSH 가능하다
ssh -i /home/ubuntu/snap/openstack/177/sunbeam ubuntu@192.168.1.24

ubuntu@test2:~$ df -h
Filesystem      Size  Used Avail Use% Mounted on
tmpfs           198M  980K  197M   1% /run
/dev/vda1        29G  1.5G   28G   5% /
tmpfs           988M     0  988M   0% /dev/shm
tmpfs           5.0M     0  5.0M   0% /run/lock
/dev/vda15      105M  6.1M   99M   6% /boot/efi
tmpfs           198M  4.0K  198M   1% /run/user/1000
기본적인 Flavor에 지정 되어 있는 Host PC의 디스크 공간을 쓰면서 인스턴스가 생성 되는 것을 확인 할 수 있다. 여기서 중요한 점은 아직 Volume 서비스를 설정 하지 않아서 사용 할 수 없다는 것이다.
MicroCeph 추가 후 다시 실행
MicroCeph Cinder Volume을 추가 하려면 Sunbeam Bootstrap 파트에서 아래와 같이 --role flag을 추가 해주면 된다
# Cluster Bootstrap 진행 명령어
sunbeam cluster bootstrap --role control --role compute --role storage
Sunbeam Cluster not initialized
MetalLB address allocation range (10.20.21.10-10.20.21.20): 192.168.1.5-192.168.1.15    					 		# 로드 밸런서 IP 주소 range
Disks to attach to MicroCeph (/dev/disk/by-id/ata-VMware_Virtual_SATA_CDRW_Drive_01000000000000000001): /dev/sdb  	# Ceph용 empty 디스크 경로
Node has been bootstrapped with roles: control, compute, storage

# microceph 디스크 추가 되었는지 확인
sudo microceph disk list
Disks configured in MicroCeph:
+-----+----------+-------------------------------------------------+
| OSD | LOCATION |                      PATH                       |
+-----+----------+-------------------------------------------------+
| 0   | ubuntu   | /dev/disk/by-path/pci-0000:00:10.0-scsi-0:0:1:0 |
+-----+----------+-------------------------------------------------+

# microceph 상태 확인
sudo microceph.ceph status
  cluster:
    id:     65c5195a-038e-4589-9ac3-25c886583a1e
    health: HEALTH_WARN
            3 pool(s) have no replicas configured

  services:
    mon: 1 daemons, quorum ubuntu (age 40m)
    mgr: ubuntu(active, since 40m)
    osd: 1 osds: 1 up (since 39m), 1 in (since 39m)

  data:
    pools:   3 pools, 161 pgs
    objects: 90 objects, 655 MiB
    usage:   683 MiB used, 19 GiB / 20 GiB avail
    pgs:     161 active+clean
MicroCeph 추가 설정 및 공식 Github 페이지는 여기서 확인
설치 완료 시 모든 서비스들이 정상적으로 Active 상태를 표시하는 것을 확인 할 수 있다
전 버전과 동일 하게 Sunbeam 초기 설정을 진행 한다
sunbeam configure --openrc demo-openrc
Local or remote access to VMs [local/remote] (local): remote
CIDR of network to use for external networking (10.20.20.0/24): 192.168.1.0/24
IP address of default gateway for external network (192.168.1.1): 192.168.1.2
Populate OpenStack cloud with demo user, default images, flavors etc [y/n] (y):
Username to use for access to OpenStack (demo):
Password to use for access to OpenStack (YB********):
Network range to use for project network (192.168.122.0/24):
Enable ping and SSH access to instances? [y/n] (y):
Start of IP allocation range for external network (192.168.1.2): 192.168.1.16
End of IP allocation range for external network (192.168.1.254): 192.168.1.58
Writing openrc to demo-openrc ... done
Dashboard을 접속하여 demo 유저로 로그인 한 후 새로운 Volume 생성

OpenStack CLI를 통해서도 Cinder 볼륨이 정상적으로 생성 및 작동 하는지를 확인 할 수 있다
# admin 계정 정보 'admin_openrc' 파일에 등록 후
source admin_openrc

# cinder-volume 확인
openstack volume service list
+------------------+---------------------------+------+---------+-------+----------------------------+
| Binary           | Host                      | Zone | Status  | State | Updated At                 |
+------------------+---------------------------+------+---------+-------+----------------------------+
| cinder-scheduler | cinder-0                  | nova | enabled | up    | 2023-06-14T13:52:32.000000 |
| cinder-volume    | cinder-ceph-0@cinder-ceph | nova | enabled | up    | 2023-06-14T13:52:32.000000 |
+------------------+---------------------------+------+---------+-------+----------------------------+